When you apply the 80/20 rule to search engine optimization, my experience indicates that you’ll achieve the majority of ranking improvements through proper keyword research and on-page optimization.
The URL slug is one of those on-page optimizations that deliver some of the biggest results, but there still seems to be confusion about the right approach.
In this blog post, I’ll address how to best write your URL slugs, the fastest way to optimize them using Xagio, and the right approach to making URL slug changes to existing pages.
Is The URL Slug Important For Search Engines?
Yes, the URL slug is extremely important for search engine rankings, and countless research studies have indicated how effective it is. It’s so important that Matt Diggity lists it as one of the 3 Kings of SEO.
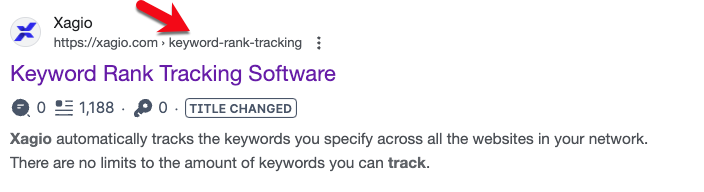
The URL slug refers to the part of the URL address that appears after the domain (highlighted in yellow):
xagio.com/keyword-rank-tracking/
From a search engine perspective, it’s a critical ranking factor as it’s one of the first pieces of data search bots encounter that describes a page’s content.
There is also a benefit to the click-through rate, as the URL address has an impact on the behavior of readers.
People usually scan the SERPs for the best results, and one area they look at is the URL. When this specifically includes words that match or relate to their search keyword, then they are more likely to click on it.
Let’s take a look at how you should optimize URL slugs so that search engines take notice.
What Does A Good URL Slug Look Like?
Here are my recommendations for good URL slugs.
1. Include Your Target Keyword
All of your URL slugs should be based on your main target keyword for each page. This is the main keyword you want to rank in search engines and you have to determine this during KW research.
It’s an important data point for Google to figure out what a page is about, and your potential organic traffic readers will also react favorably to it.
Good URL Slug: https://xagio.com/keyword-rank-tracking/
Bad URL Slug: https://xagio.com/track-your-keywords
2. Make It Short And Concise
People used to be tempted to use the URL slug as an opportunity to stuff as many partial keywords as possible.
However, that can negatively impact search results and readability, so always make sure you try to make the slug as concise as possible.
Keep in mind that the WordPress editor typically sets the automatically generated slug to the full page title, which can end up being very long.
Good URL Slug: https://xagio.com/keyword-rank-tracking/
Bad URL Slug: https://xagio.com/the-best-tools-for-keyword-rank-tracking-for-free/
3. Separate Words
Always separate words by using hyphens (“-”) rather than underscores (“_”). Not only does it look better and consistent, but Google advises developers to use hyphens in its URL structure guidelines.
Good URL Slug: https://xagio.com/keyword-rank-tracking/
Bad URL Slug: https://xagio.com/keywordranktracking/
4. Use Lower Case
Another good practice is to avoid any upper case letter in the URL slug. Browsers always display the domain in lowercase, so having the entire web address shown in lowercase looks more consistent.
Good URL Slug: https://xagio.com/keyword-rank-tracking/
Bad URL Slug: https://xagio.com/KEYWORD-RANK-TRACKING/
5. Avoid Dates
The final piece of advice I would give you is to avoid adding dates or years into the URL slug. Even if your main target keyword includes a date or year, it’s better to make your URL evergreen.
Readers who see a URL with the year 2021 in it will quickly decide that the content is out of date, even if it’s still relevant and accurate.
Good URL Slug: https://xagio.com/keyword-rank-tracking/
Bad URL Slug: https://xagio.com/best-keyword-rank-tracker-2023/
Setting URL Slugs For New Projects
In this section, I’m going to address how you plan and set up URL slugs for new websites or content projects. There are differences in the approach you need to take compared to re-optimizing existing pages, so only follow these steps if you want to optimize the URL slug for new pages.
Complete Keyword Research
The foundation for every SEO blueprint has to be keyword research, and Xagio includes Audit and AI Wizard tools that make this process extremely fast and effective.
Follow our recommended recursive keyword research process to ensure that you cover all possible page and keyword clusters.
Update URL Slugs In Xagio’s Project Planner
By far the easiest and fastest way to set the URL slug of a page is by opening your master project in Project Planner (see the above step for details about performing KW research).
Log into your WordPress dashboard and navigate to the Project Planner tab of the Xagio plugin.
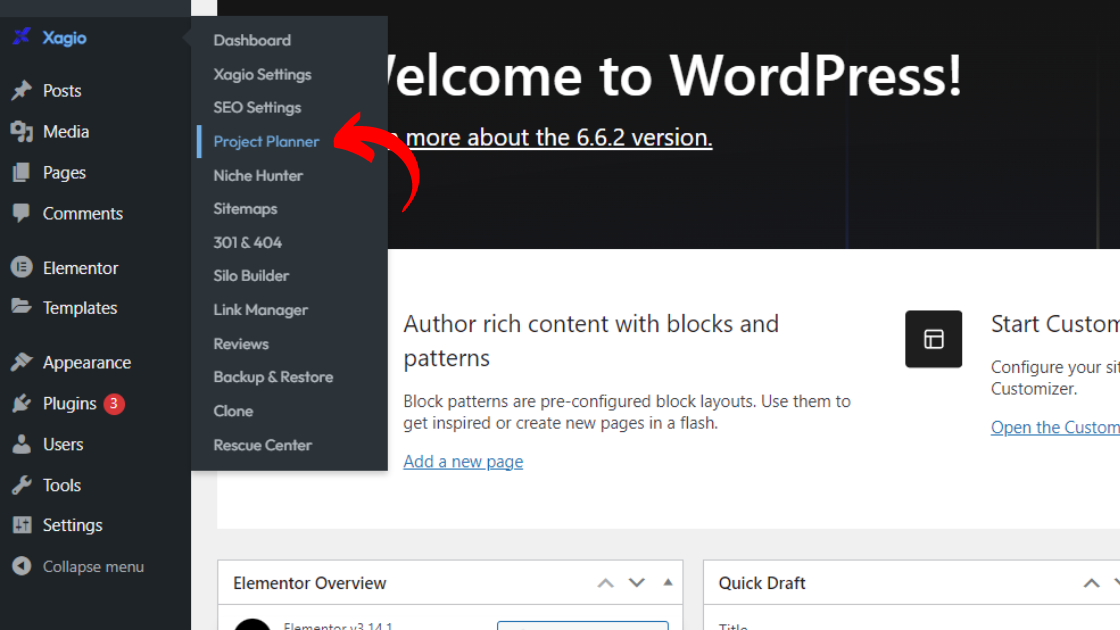
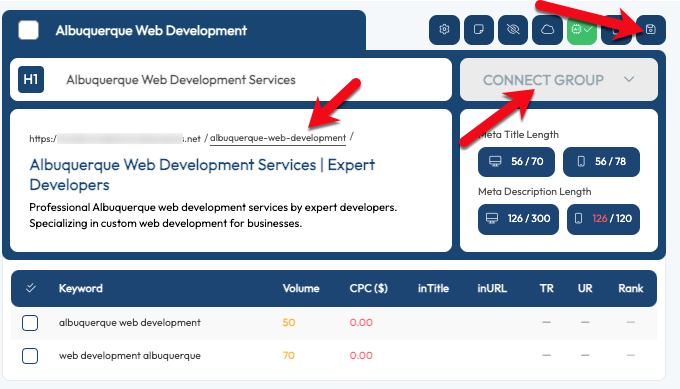
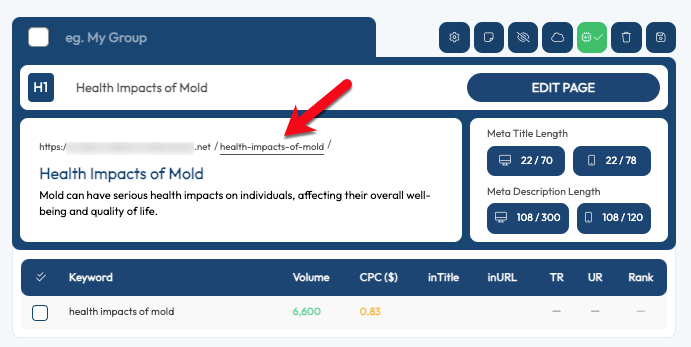
Open your master project and choose the keyword group that you want to optimize the URL slug for. By default, it will appear as blank, but you can simply click on the slug section and then type in your chosen text.
Next, click on the “Save” button and then on “Connect Group”.
This will help you to create a new page for this keyword group and it will automatically set up the URL slug the way you entered it.
Update URL Slugs In Xagio’s SEO Settings
The second option you have for defining the URL slug of a new page is to manually create the page or post with the WordPress content editor.
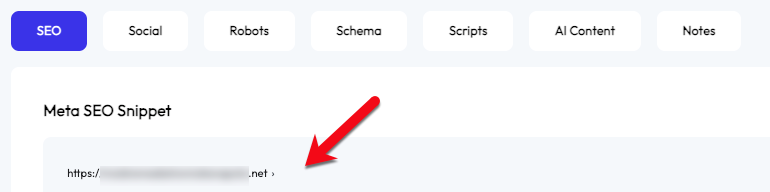
Create a new page or post using the content editor, and then scroll down to the bottom of the page to see the Xagio plugin settings.
On the SEO tab, you’ll see the domain, and if you click on the blank space after the domain, you’ll be able to enter the URL slug.
Updating URL Slugs For Existing Projects
Before you start randomly changing the slug for existing pages and posts, you have to be aware of some impacts this can have.
What Are The Risks?
I mentioned above how important the URL slug is for keyword rankings. The problem is that when you update a critical ranking factor, you can see sudden and drastic changes.
These changes can end up with rankings jumping up and down for days and even weeks.
And if you change URL slugs for pages that already have a decent amount of traffic, then you could end up with erratic traffic.
Let’s say that you’re already in position #3 for your main keyword and get hundreds of page views a day. It could be extremely risky to the existing traffic and income if you change the page slug.
You also have to consider that you may have backlinks to the page, and if you don’t have full control over them, you could end up losing that link juice unless you’re clever with page redirects.
More on that shortly.
I’m not saying that it’s always a bad idea to do it in this situation, but you have to weigh the risks and consider other SEO tactics that might get you higher rankings.
However, If you’ve got pages that are struggling to break into page 1 of the SERPs, then it’s a good idea to start optimizing the slugs.
There’s an extra step involved to redirect the old URL to the new one; missing this step could end up negatively impacting your rankings.
Let me explain.
Xagio’s Automatic Redirects
When you change the URL of a page, any backlinks to the old URL won’t work, and your website will show a “404 Page Not Found” message instead of the page’s content.
This poses two problems.
First of all, you’ll lose the link juice from backlinks, which will likely negatively impact your rankings.
Secondly, you’ll need to update any links you have on social media or internal links on your website–otherwise, readers will end up on your 404 page.
Fortunately, Xagio has a clever solution for this.
Navigate to the “301 & 404 Management” tab in the Xagio plugin on your website and click on the Settings tab.
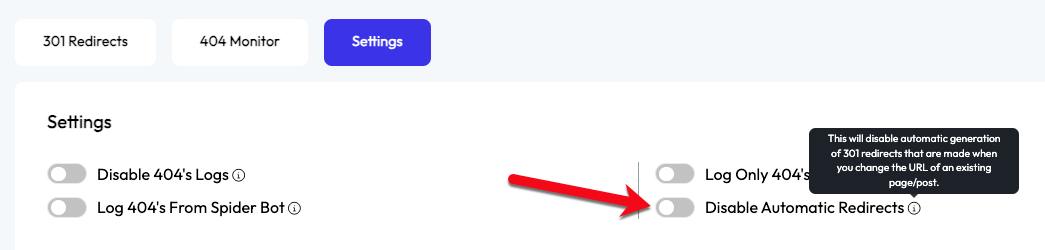
By default, Xagio will automatically set up a 301 redirect from the old to the new URL when you make changes to the slug on existing posts and pages.
Any incoming traffic and backlinks will then automatically redirect to the new URL.
Before you start making URL changes, just make sure that you haven’t accidentally toggled the switch on, which would disable this feature.
Update URL Slugs With Xagio
The best way to update the slug for multiple pages is to use your master Xagio audit, which should include all your existing pages and the keywords you’re targeting for them.
You can find out more about this step above and in our dedicated keyword research post.
Log into your WordPress dashboard and navigate to the Project Planner tag of the Xagio plugin.
Open your master Audit project and navigate to the keyword group for the page where you want to change the URL slug and double-click on the slug text.
Once you’ve updated it to the optimum keyword as described above, click on the “Save” button.
This will automatically change the slug for the page without having to open the page editor for each individual page.
Repeat these steps for all of the pages you want to optimize.
Start Using Xagio For On-Page Optimization
Start optimizing URL slugs with ease and speed, and ensure that the text you choose is based on tangible data.
I have shared the effects these on-page optimizations have had on my projects, and you can see those results here.
You will need XAGS in your account to run Audits for completing keyword research. The easiest way to get all the XAGS you need for your SEO projects is by upgrading your account today.