If you already use the Xagio plugin and love how much time and effort the features save you, but you’re bummed out because you also have a non-WordPress site, then this blog post is going to open your eyes.
You can still research and plan a website using the Xagio Cloud features and then copy-paste all the recommendations to any other type of CMS (Wix, Squarespace, Weebly, and Shopify, to name a few).
It all comes down to the three fundamentals of SEO:
- Keyword research
- On-page optimization
- Off-page optimization
When you get the first two right, then you need less time, effort, and money to take care of the third.
There are three main features in Xagio Cloud that will help you take care of those first two fundamentals on any non-WordPress website:
- Project Planner - for keyword research & Optimization
- Schema Builder - to build JSON-LD Schema code
- Rank Tracker - to track your rankings
And I’ll now show you exactly how it works.
How Can Xagio Improve Your Non-WordPress SEO Processes?
There are two areas where Xagio will provide huge time savings with extremely effective optimizations. These are tried and tested SEO tactics that you simply can’t afford to ignore for any website project.
Let’s start with the most important process I use.
1. Keyword Research
This is the most critical step for every SEO strategy and it builds the foundation for everything else you do to improve rankings.
This is what I do.
Step 1: Audit Your Website
If you’re starting with a brand new website, then skip to step 3 to perform KW research based on competitor research.
Otherwise, head over to the Xagio Cloud App and navigate to the Project Planner. This is where all your keyword research takes place, and the first thing you need to do for a non-WordPress website is determine your ranking target keywords.
To do this, launch the Audit tool and enter your website’s URL.
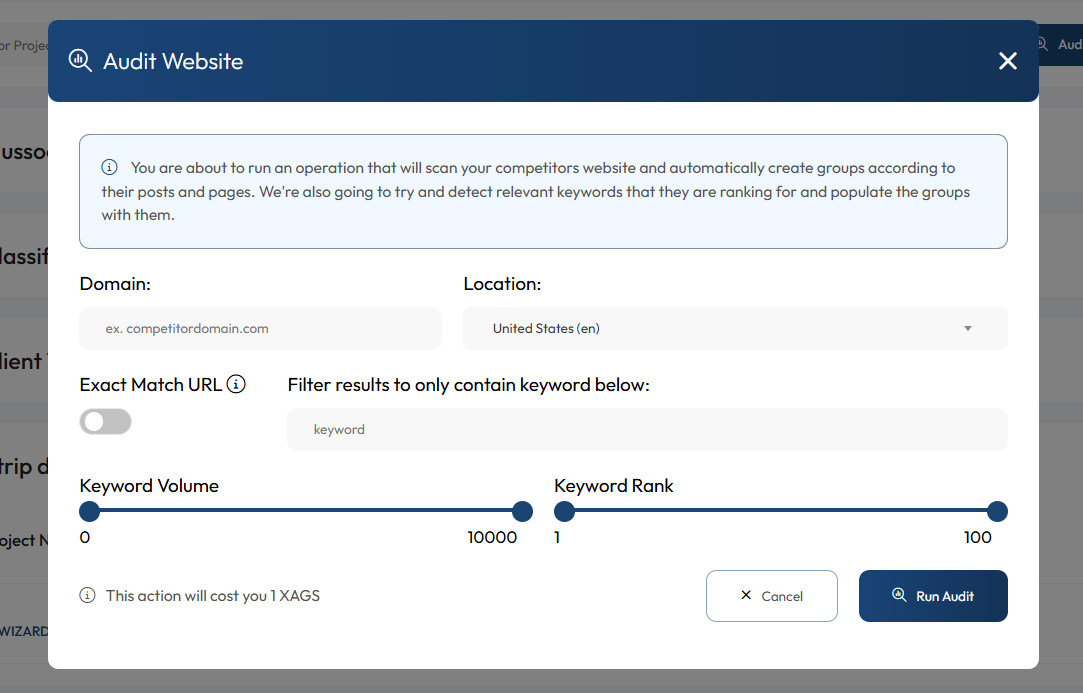
In less than 10 seconds, you’ll have a full overview of all the pages that have ranking keywords (Note: if your site isn’t ranking for any keywords, then you will get an empty audit).
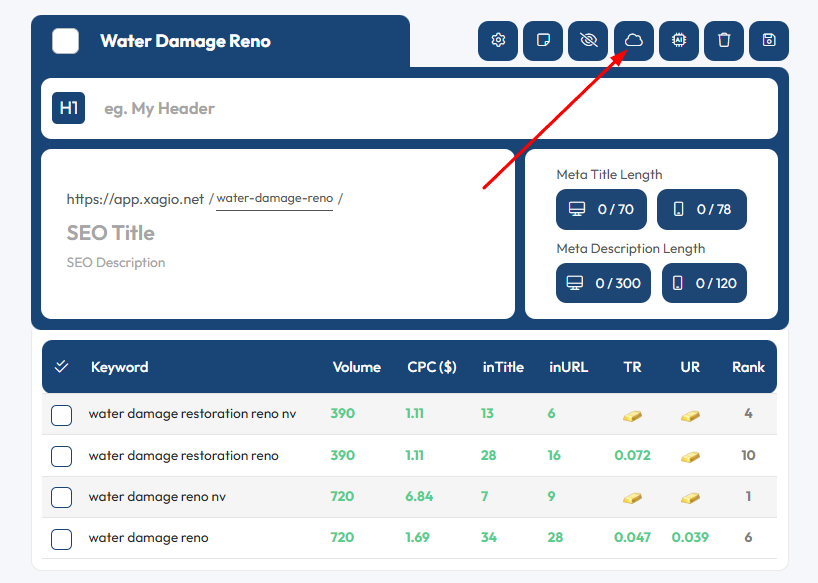
Each ranking keyword will be listed with the last known meta title, H1, URL slug, and description, as well as the search volume, CPC, and last known ranking.
The best part is that your keywords will all be clustered into groups based on how the pages are set up and ranking.
What Xagio does in less than 10 seconds would take you days to manually sort through using other SEO tools and manual processes.
The main difference in this step compared to using the Xagio WordPress plugin is that there is a limitation.
When you use the plugin on a WP site, the Project Planner Audit isn’t connected to all pages and posts. As a result, any changes you make in the Audit won’t reflect on the website.
Step 2: Analyze The Ranking Keywords
The next step you should take is to focus each group’s cluster for semantic relevance by either removing or adding relevant keywords.
Here’s how I do that.
I first look at every single KW cluster group and read through the keywords. You can also open the Word Cloud and select certain important words for the cluster to see which keywords fit into this group.
When you find keywords that you don’t think belong into a group, then you have to decide whether they are suitable for the project or not.
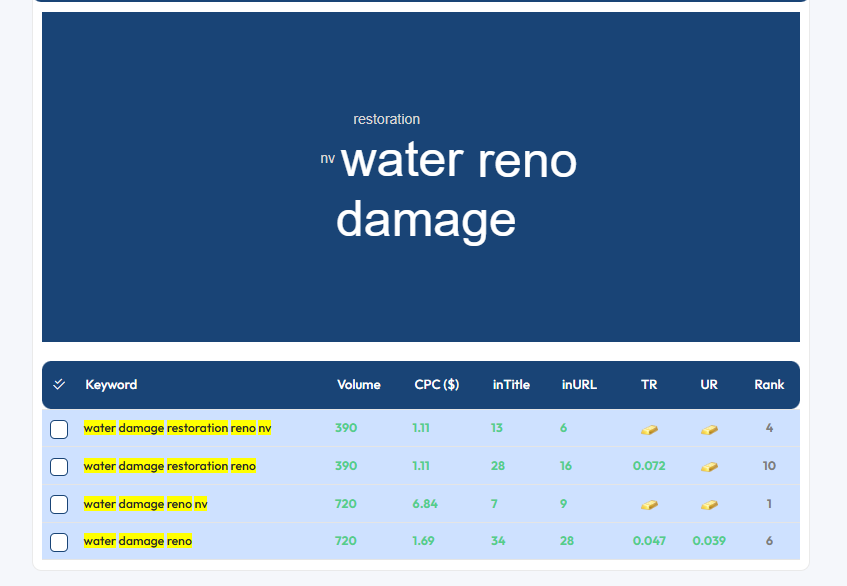
If they are, either move them to a more relevant existing KW group or create a new group and drag those keywords over.
You can delete those KWs that you simply won’t be targeting.
Here’s how different focused KW clusters will look like compared to how it started.
Step 3: Audit Competitor Websites
If you have an existing website and followed the first two steps, you only have KW data about your own website. But there are countless more KWs that your competitors are targeting.
And if you’re starting with a brand new website, then competitor keyword research is going to be your first step.
What you need to do is repeat the above steps for your top five or more competitors. You’ll end up with at least six Audit projects where you’ve gone through the analysis and clustering in each one.
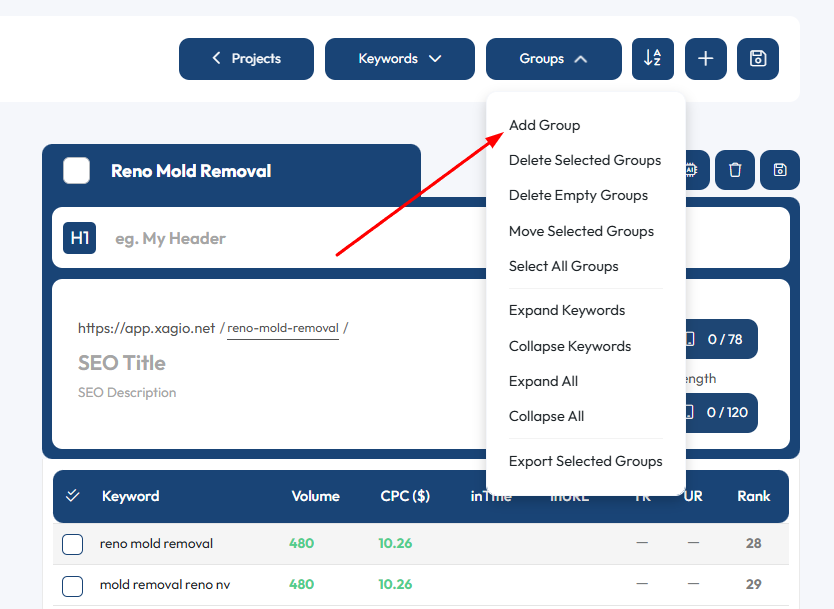
Then, you select all the groups in the competitor Audits and use the move function to copy them over to your master Audit that you ran on your own website.
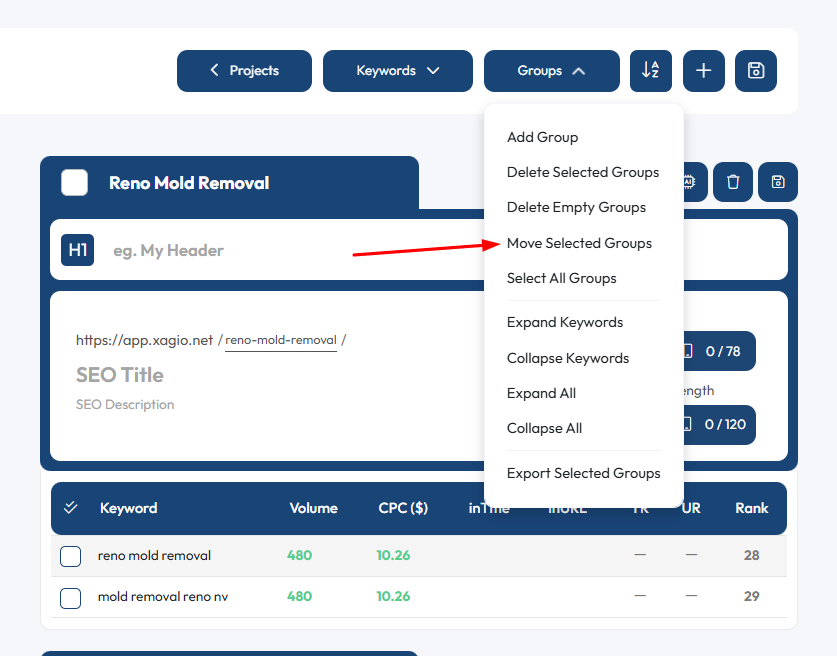
You’ll likely end up with duplicate KWs, and Xagio has a great feature where you can quickly remove duplicates with the click of a button.
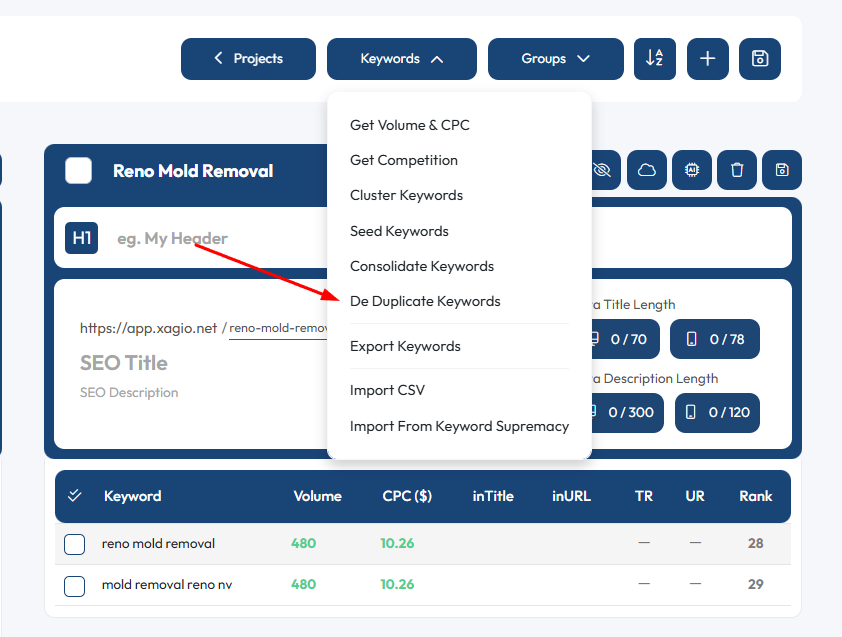
This will save you hours of finding duplicates, and only takes a few seconds to execute.
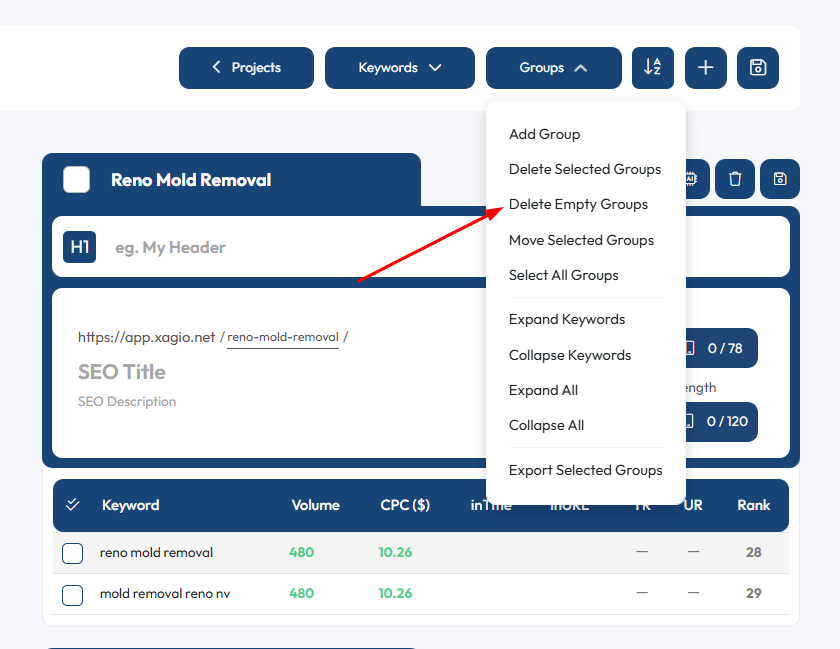
The final step involves removing empty groups from your master project, as this will indicate that the keywords they once contained are now covered in other groups.
Again, Xagio will automate this for you by using the “Delete Empty Groups” feature.
At this stage, you’ve got your KW groups well-defined and it’s time to look at competition.
Step 4: Fetch Keyword Competition Metrics
To do this, simply select the KWs you feel are the top candidates in each group and then use the “Get Competition” feature from the Action menu.
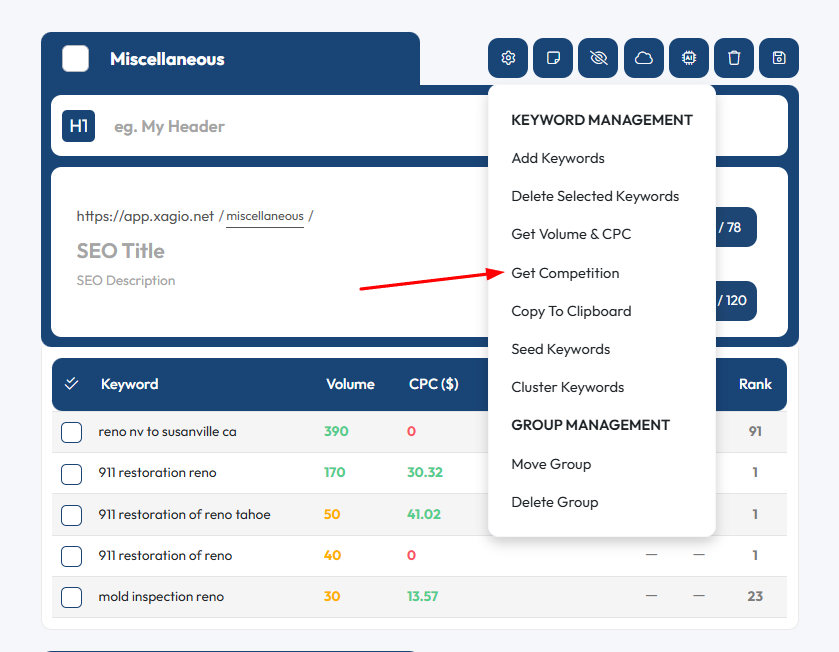
This will gather data about how many sites have the exact keyword in the URL and Title tags and then determine a ratio that indicates how competitive the KW is.
Xagio will even highlight those keywords that have the lowest competition with a gold bar, and these are the ones you need to focus on.
You can also check out our blog post on finding keywords to get more detailed steps.
One other thing you should do is look for keyword clusters where some rankings look extremely low.
When you have a mix of keywords on page one and page 5 or below, then it could be an indication that you’re dealing with keyword cannibalization.
The solution to this would be to cluster those low-ranking keywords into new groups and create dedicated pages.
2. On-Page Optimization
The way I approach on-page optimization is the same every time, regardless if I’m starting on a new or existing site or whether it’s an affiliate or local-based site. And this all begins with keyword research and identifying what the best keywords for each page of my site should be.
Proper keyword research provides me with keyword clusters for each page, from which Xagio’s AI can perform the most underutilized optimization strategy called Keyword Cloud Optimization.
Here’s what I do.
Step 1: AI-Powered Optimization Suggestions
Now that you have a good idea about the search volume and competition of your target keywords, it’s time to witness the insane power that Xagio’s AI provides.
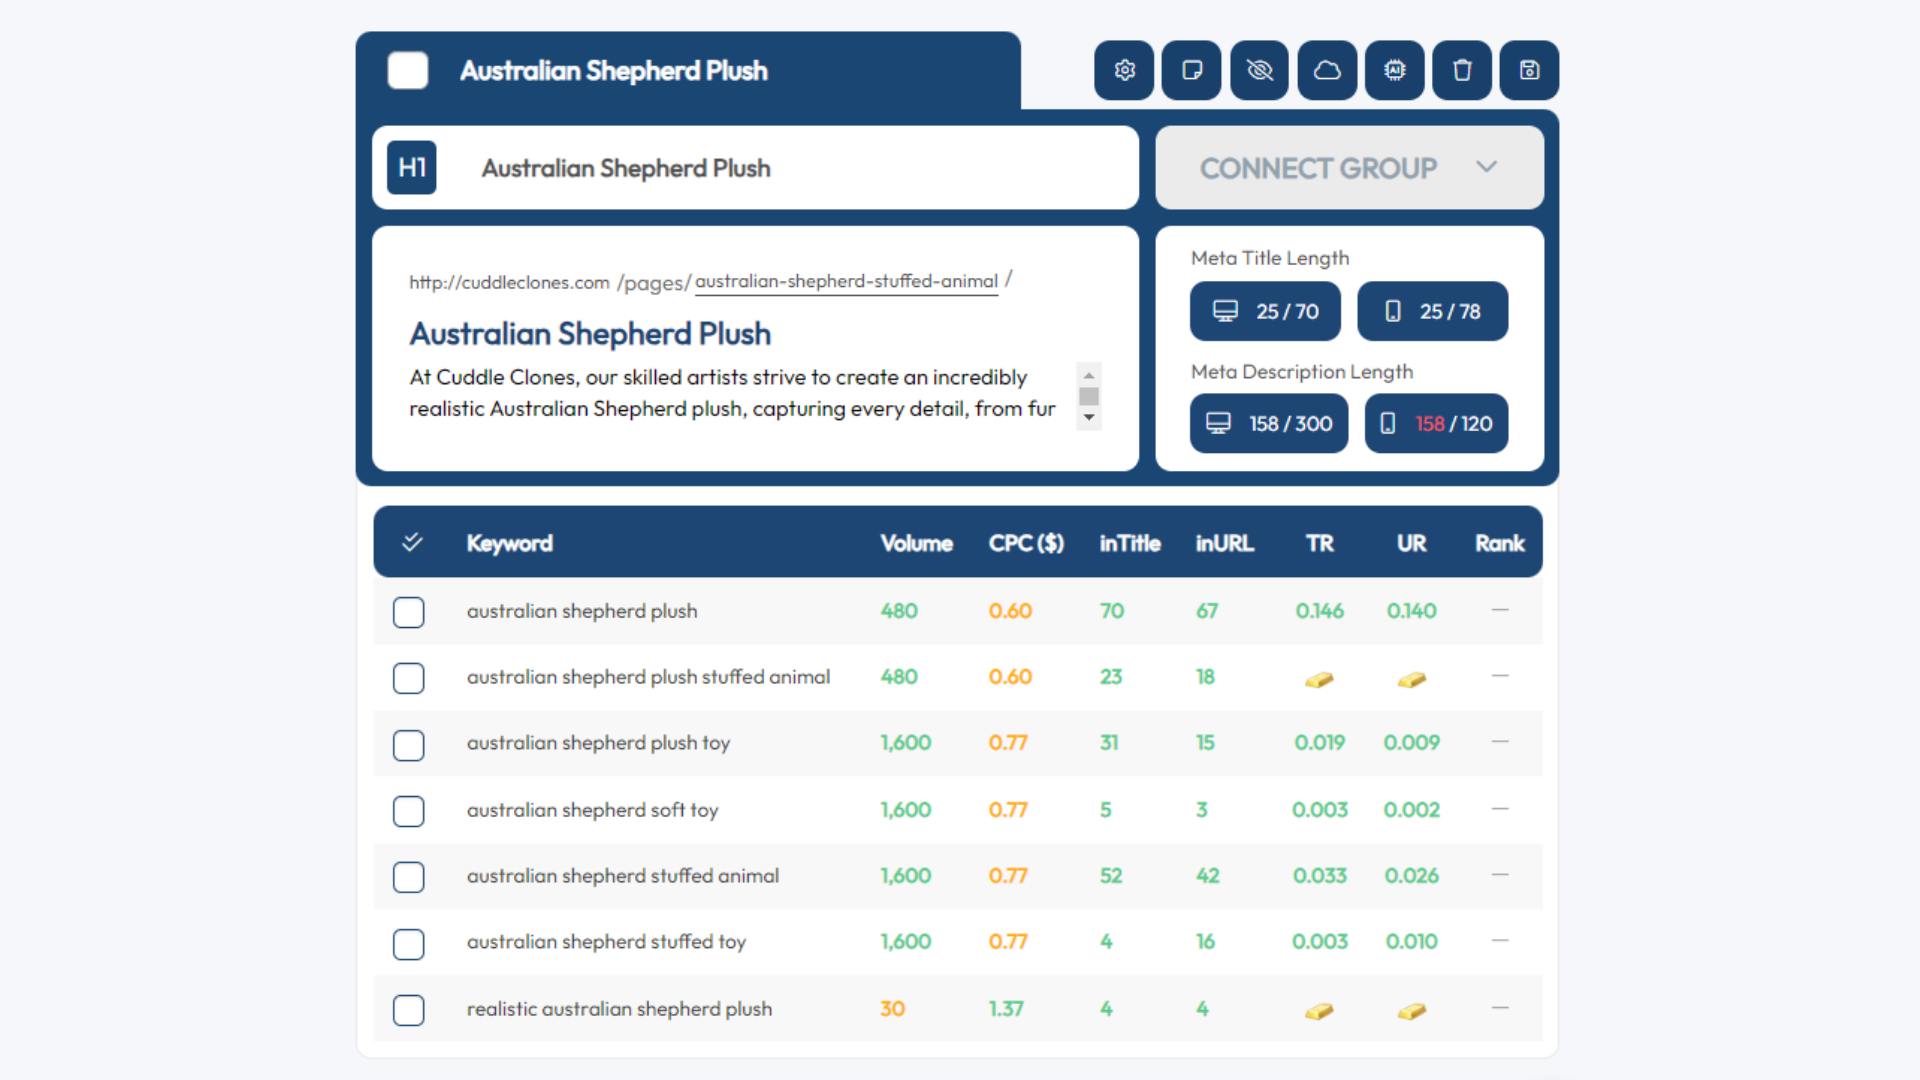
In your Project Planner site audit, head to a page and keyword group that you’d like to optimize.
Click on the “Optimize with AI” button at the top of the group.
In the “AI Optimization Settings” you can either choose the main focus keyword you want to target or select nothing and let Xagio’s AI make the best choice.
Less than 10 seconds later, Xagio will provide you with five recommendations for each of the H1, Title, and Meta Description tags.
These will be perfectly optimized from an SEO perspective, and if you want to make some changes, simply click on the text and start editing.
Once you save your preferred selection, the three meta-tag values will be populated at the top of the keyword group.
What normally could take 15 minutes of creative struggle is now done in seconds.
Step 2: Copy On-Page Suggestions To Your Site
While the Xagio WordPress plugin takes an extra step to automatically update the three meta tags on the actual pages, you’ll have to take one extra manual step on non-WordPress sites.
What you’ll need to do is log into your website’s CMS dashboard and load the page editor for the data you’ve optimized with Xagio.
Navigate to the SEO settings for that page and then copy and paste the H1, Title, and Meta Description tabs from Xagio’s Project Planner.
This should only take you another 20 seconds and still beats manually creating those tags for dozens or hundreds of pages.
I bet you’ll experience at least a 10x process improvement here.
You will need XAGS (Xagio’s currency) to enable premium features like AI Optimization, and we have a few options for topping up your balance.
3. Schema Markup Optimization
The second Xagio feature that you can use with non-WordPress sites is the Schema tools. It’s by far the fastest and easiest way to add important schema markup to all your pages.
I’ve created a dedicated blog post on creating schema markup, but here’s the easiest process I recommend.
Step 1: Determine The Type Of Schema You Need
Whether you’re working on a local business website, an affiliate offer, or an informational news blog, you need to start by deciding what schema type to use.
There are literally hundreds of different schema types, from LocalBusiness to Organization and Movie Review to Product Description.
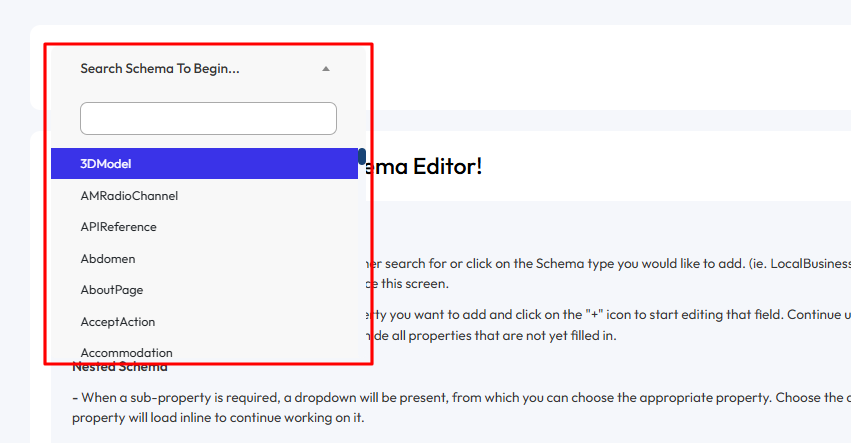
Sometimes, more than one type might apply, while other times, you might have to go a bit more high-level than the type of content you have.
My top tip is to check out what the pages in the top 1–3 positions in Google have as their schema. This will give you a good indication of what type you should choose.
Step 2: Create The Schema
Xagio offers multiple ways to create a schema markup, including completely manually, where you have full control over what tags to include and exclude.
Manual Schema Creation
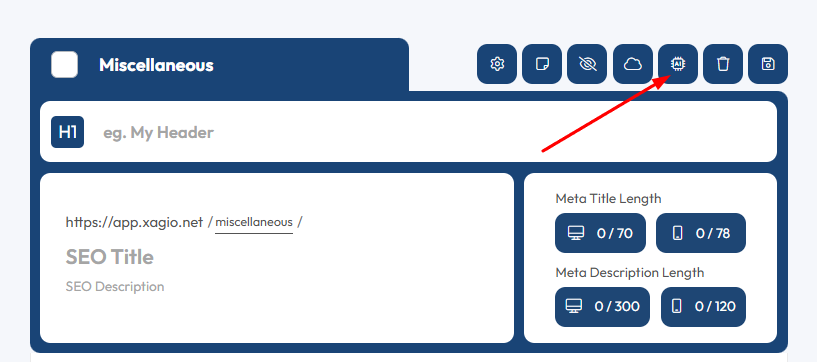
When you head to the Schema section of the Xagio Cloud App, there is a Schema section where you can start with an easy-to-use navigation tool.
Simply search for the type of schema you want to build and the editor will then give you the ability to search for properties you want to add.
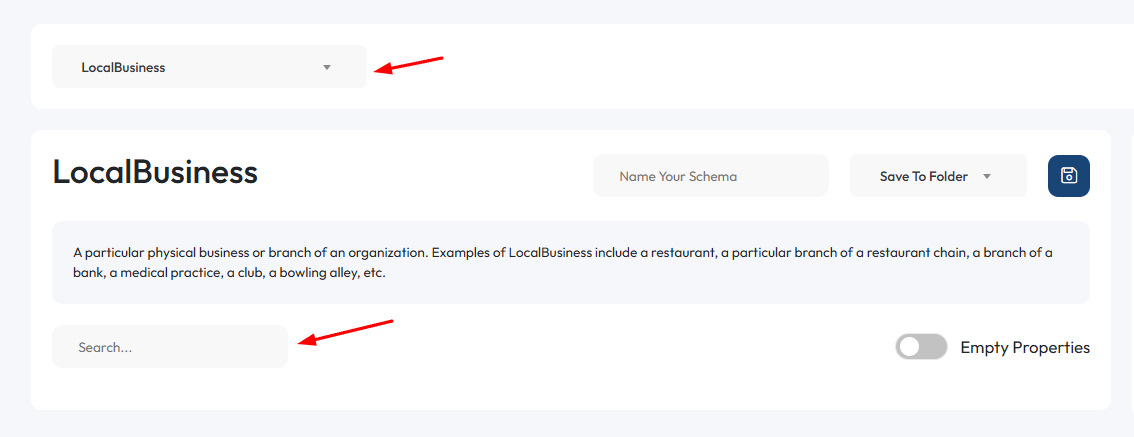
If you have experience with schema data and want to achieve a specific result, then this tool is ideal for making that happen.
However, there is one feature in Xagio that will make this process insanely easy.
Use The Schema Duplicator
I mentioned in step 1 that looking at what your competitors are implementing on their pages is the best way to copy something that’s working well in Google SERPs.
Now, imagine simply copying your competitor’s schema and replacing the data with your own.
What Xagio allows you to do is duplicate the schema from another page at the click of a button.
Simply head to the Schema section in the Xagio Cloud App and hit the “Duplicate” button. Then, enter the URL of the page you’d like to copy and navigate through the prompts to edit the schema data and make it relevant to your page.
In less than a minute, you’ll have the schema markup ready to go.
Step 3: Test The Schema Markup
One thing I always recommend is running a quick test to validate your schema. One way to find all errors and warnings is to use Google’s schema validator.
This will highlight syntax issues as well as minor issues.
While bad schema won’t directly impact your rankings, it’s always best practice to ensure that you don’t have bad HTML code on your site.
This step takes just a few seconds, and it will also ensure that you capture rich results in the SERPs.
Step 4: Copy The Schema To Your Website
With Xagio installed on a WordPress site, you can easily assign a schema in the plugin section of the page editor.
However, on non-WordPress sites, you’ll need to copy and paste the schema markup code manually.
You’ll need to navigate to a plugin or HTML code section in the CMS you’re using. Simply copy the schema code from the Xagio Cloud App and then paste it into your CMS.
It’s still one of the fastest ways to ensure that you have accurate and effective schema markup on all your pages, even if there’s the added step of copying and pasting the code.
4. Rank Tracking
The two ways to monitor the results of your SEO strategy are to monitor your page visits and keyword rankings.
Both are important, but tracking your keyword rankings will give you far more valuable information about how your SEO is impacting specific search terms.
Xagio offers a Rank Tracking feature where you can add any website along with a set of keywords to track.
Simply log into the Xagio Cloud App and head to the Rank Tracker tab.
At the top of the screen, you’ll see a “+” button, which will allow you to add a domain and keywords.
All you need to do is enter your domain and the keywords you want to track and set the search engine and location settings (these default to Google and USA).
Xagio will then check the rankings every 48 hours, and you have some cool features to get more out of the Rank Tracker.
First of all, you can add more keywords to track by clicking on the “+” button. The more KWs you add, the more XAGS you need to keep track of them, but we’ve made it a very affordable and flexible feature.
Secondly, you can share the rank tracking data as a graph by clicking on the share button. This is particularly helpful for client SEO where you can use the Xagio Rank Tracker as part of your regular reporting.
And finally, you can easily view a graph of your ranking data. Select the keywords you’d like to visualize and then click on the graph button. This will load a graph showing the progress over time so that you can see directly when and where your SEO strategy has paid off.
Keep in mind that Audits, AI Optimization, and Rank Tracking are premium features that require XAGS to use. Find out more about how to top up your account in our introduction to XAGS post
Start Using Xagio For Non-WordPress Websites
Sign up for a Xagio account and test the above process to experience massive improvements in SEO productivity.
Whether you don’t have WordPress sites or manage a mix of different CMS platforms, speeding up your on-page and schema optimization alone will save you many days of manual work.
And when you add in the huge process improvements Xagio provides for keyword research, this will quickly become one of the most important SEO tools you have available.