Stop The Time-Consuming Process Of Manual Silo Planning And Implementation
Having a website without a carefully planned SEO silo structure is like visiting a medieval city with winding alleys and no road signs or maps.
Not only will your visitors find it difficult to navigate the content, but search engines won’t have a clear picture of what your site is about.
With search engine rankings depending a lot on your site structure, you’re probably facing the same difficulties as all other SEOs.
You have to come up with a clear map of your content, decide on physical or virtual silos, and then implement optimizations to support this structure.
What I’ll show you in this post is how over 15 years of experience have resulted in my exact process for planning and implementing silo structures using Xagio’s automation tools.
Benefits Of A Carefully Planned Silo Structure
Before I get to the exact process of planning and mapping out a silo structure, I want to first show you why it’s such an important SEO task.
And it all comes down to four main benefits.
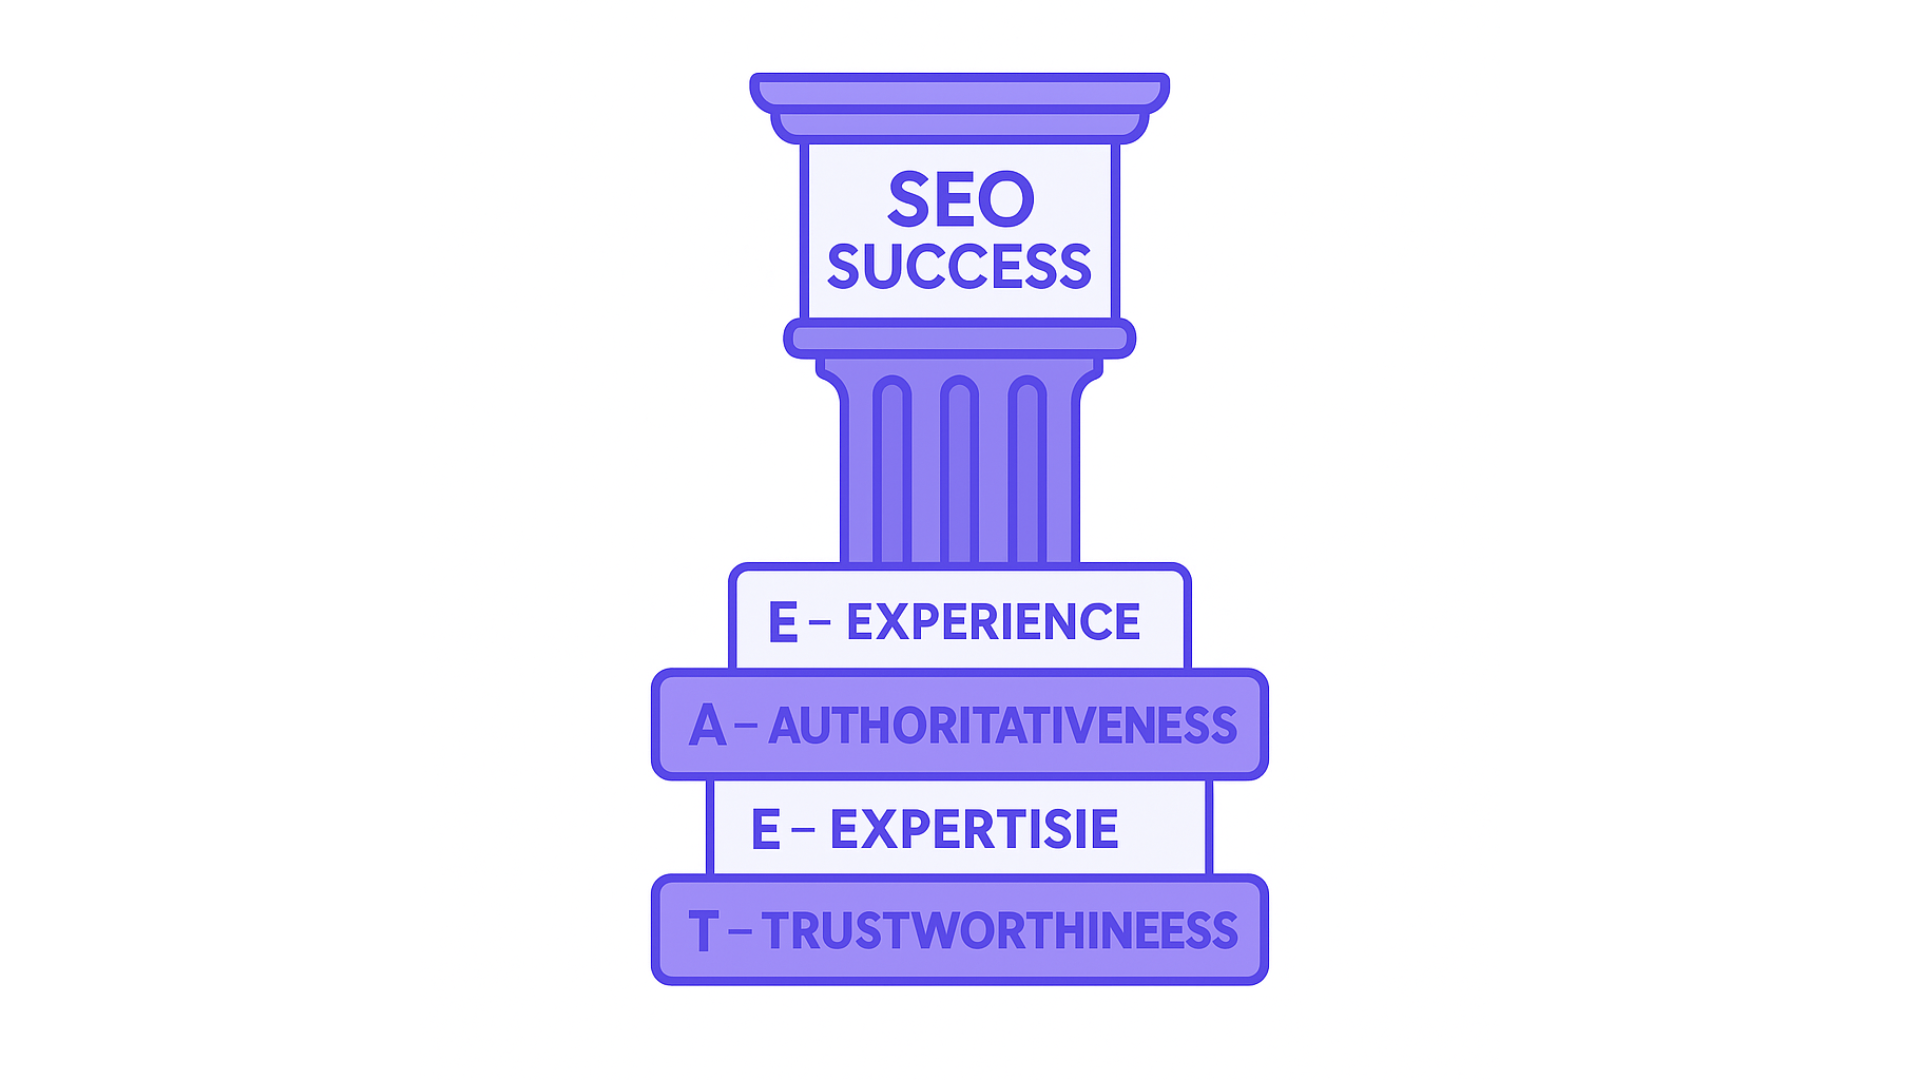
1 - Communicate Subject Expertise And Authority To Search Engines
Experience-Expertise-Authoritativeness-Trustworthiness (EEAT) is one of the most important ranking factors that Google keeps drawing content creators to.
And in order to demonstrate to Google that your site represents expertise in your niche, you have to make it easier for the search engine to understand what it’s about.
What a silo does is allow you to categorize relevant pages into a hierarchy of subtopics.
Here’s what that means.
Let’s say your site is about stuffed animals. You could have sections about “stuffed dogs”, “stuffed cats”, “stuffed monkeys”, and any other animals you can think of.
Then, within the “stuffed dogs” category, you could have “stuffed labradors”, “stuffed poodles”, etc.
You can further break these subtopics down by size and cost, giving you dozens of sub-categories.
When you then organize all your content under these categories, you build clear signals so that search engine spiders understand that you have the expertise. You’ll also become a lot more authoritative because of your organized approach to providing all the relevant information about your niche.
2 - Improved Navigation Experience
Let me go back to my comparison above about visiting medieval cities with no road signs. If you go to a city like New York, which is built on a grid system with very easy-to-follow road signs, you’ll find your way from A to B without the help of Google Maps or a local guide.
Your silo website structure will do the same for visitors.
They can see your categories and subcategories on menus or navigation pages and get a clear picture of what direction they want to go to find the website content that best covers their intent.
Why is this important for your SEO efforts?
Simple: when your visitors find it easier to navigate the content on your site, the time-on-site metric will go up, AND your bounce rate will go down.
That results in improved visitor engagement, which is something search engines pay attention to when it comes to ranking your site because it’s a clear indicator that your website is satisfying the needs of the visitors.
3 - Optimized Internal Linking
Internal linking between content pages is a critical factor in ranking a website for two reasons.
First of all, it’s important to understand how search engines crawl websites. Bots land on your website due to an external link or updates you provided in Google Search Console, e.g., through sitemap updates.
Search engine bots then analyze the page and follow all links to other pages. The more internal linking you set up, the more active the bots will be on your site.
Also, when those links are not just completely random but rather provide a clear map of your site structure, then it will boost indexation and rankings.
Secondly, linking to other pages from within your content makes it a lot easier for visitors to navigate different topics and find the answers they’re looking for. This further boosts user engagement, providing a positive impact on your rankings.
4 - Improved Link Juice Flow
It’s a well-known fact of SEO that most of the link juice from inbound links goes to the target page. However, some of that valuable juice flows from the landing page to others as bots follow the internal linking through the website structure.
The more your SEO silo focuses on the distribution of link juice among all content pages, the better your link-building efforts will influence your overall rankings.
In my over 15 years of experience in SEO, I have learned that properly implementing a link structure can set you apart from all your competitors.
The challenge I had was defining the internal linking structure of established sites, and Xagio AI can help you with all aspects of planning and optimizing SEO silos.
More on that shortly.
5 - Boosted Rankings For Long-Tail Keywords
The final benefit that you’ll notice from a properly executed silo structure is that you’ll find it a lot easier to rank long-tail keywords in the search engines.
These are typically bottom-of-the-funnel and informational content pages that have lower search volume. But having lots of well-ranking long-tail pages will add up to a huge amount of traffic.
Here’s the challenge, though.
Building links to long-tail website content isn’t practical and cost-effective. However, a properly siloed site architecture will send enough link juice down to these pages and boost their rankings.
You’ll notice changes in days with carefully chosen and subject-relevant keyword phrases in the anchor text for your internal site linking.
Let’s now turn to creating a silo site structure.
Planning Your Silo Structure
At the heart of all SEO efforts, including SEO silos, is a solid keyword research foundation. Only with a clear picture of what keywords you need to target and how to combine them into groups will you stand a chance to grab the attention of search engines.
Here’s what you need to do.
1 - Analyze The Website Theme
Before you develop a silo site architecture, you have to do two things to get the relevant information.
The first thing I recommend you do is spend some time brainstorming ideas. Let’s go back to the example of stuffed pets above.
The first thing you want to write down is all the types of animals that you might be able to source as stuffed toys. Then, under each animal, you can list out the different breeds; you also want to think of things like color, price, size, etc.
Each of these will help you create distinct subject categories to start with.
Now comes the more powerful approach.
Using Xagio Audits, you can extract all the ranking pages and keywords from your competitor’s sites. These will be already clustered into keyword groups, saving you a massive amount of manual work.
Analyze these pages for further ideas to create even more sub-categories for your silo.
Quick Tip: You can check out our blog posts on keyword research using Xagio audits and wizards. This approach should be your foundation for every SEO project, and you’ll love how many days of work it saves.
2 - Website Architecture With Physical Silos
A physical silo structure involves setting up categories and subcategories as parent pages with all the relevant topical pages listed as child pages under each category.
It’s best explained with an example of a site that has an excellently planned physical silo structure.
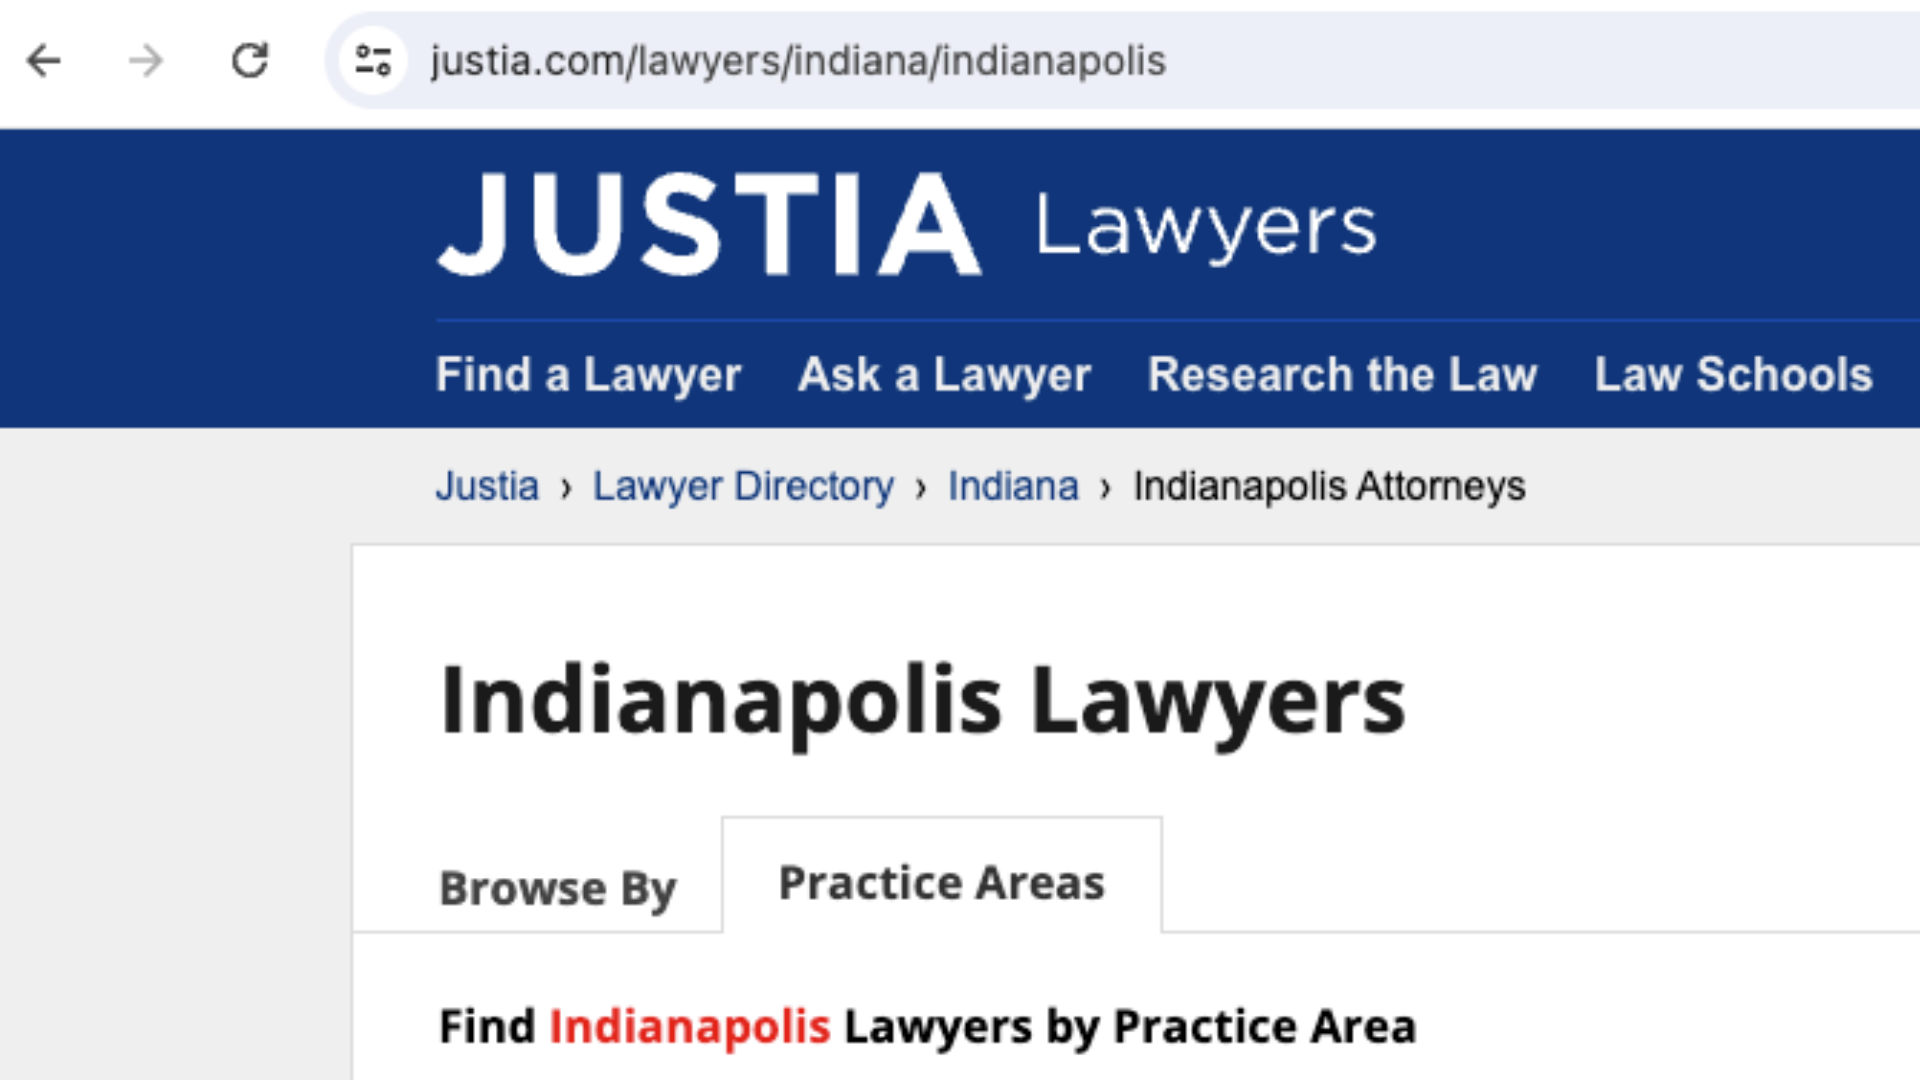
What SEOs at Justia have done is create a parent category called “Lawyers” with a subcategory for the state of “Indiana” and another subcategory for Indianapolis.
The further down the category pages you go, the clearer it becomes.

In order to see how well-formed a physical silo is, you need to read the URL backward. In this Justia case, it then clearly shows a target keyword as well: Indianapolis Indiana, Personal Injury Lawyers.
And that sends a very loud and clear message to search engines.
While you can add internal links within your page content of categories, it’s not an essential practice in a physical silo structure. The URLs provide clear information to search engine crawlers about the site structure.
3 - Website Architecture With Virtual Silos
In a virtual silo architecture, you don’t create a child and parent page relationship through the URL structure.
Instead, you use internal links to demonstrate the relationship.
All the pages would be under the main domain name, and in the Justia example above, there would be a justia.com/lawyers page and a justia.com/indianapolis page. The lawyers page would have an internal link to the Indianapolis page to create the silo connection.
The main difficulty with using internal links to create your silos is that it can be difficult to manage the integrity.
See, you’re not just going to link to pages in the silo structure, but there are often opportunities to link across silos where there might be a supporting page for a specific topic.
The more interlinking you do outside of a silo, the more it can dilute the message you’re trying to send to search engines. You would have to nofollow some of the internal links, which adds more admin overhead.
4 - Add Keyword-Rich Pages
Once you have your SEO silo architecture defined, it’s time to fill it up with supporting pages. Based on your keyword research and silo setup, you should be in a position to identify any gaps in content as well as find opportunities to move existing pages to a better part of the silo.
Each topic should get an informational or landing page, and the sooner you build out your silo content, the more likely that search engines will identify you as an authority on a topic.
It’s critical to plan your content on a per-page basis and include keywords and keyword synonyms from your research phase. We have a dedicated post to cover keyword research that will help you avoid missing out on critical optimizations.
Use Xagio For Silo Automation
In this section, I want to show you my favored process for planning silos. It’s based on over 15 years of experience that has resulted in a few amazing features.
Let’s dive right in.
1 - Start With A Xagio Audit
Whether you’re starting on a brand new website project or want to better optimize an established site, the first thing you should do is start with Xagio’s Audit feature.
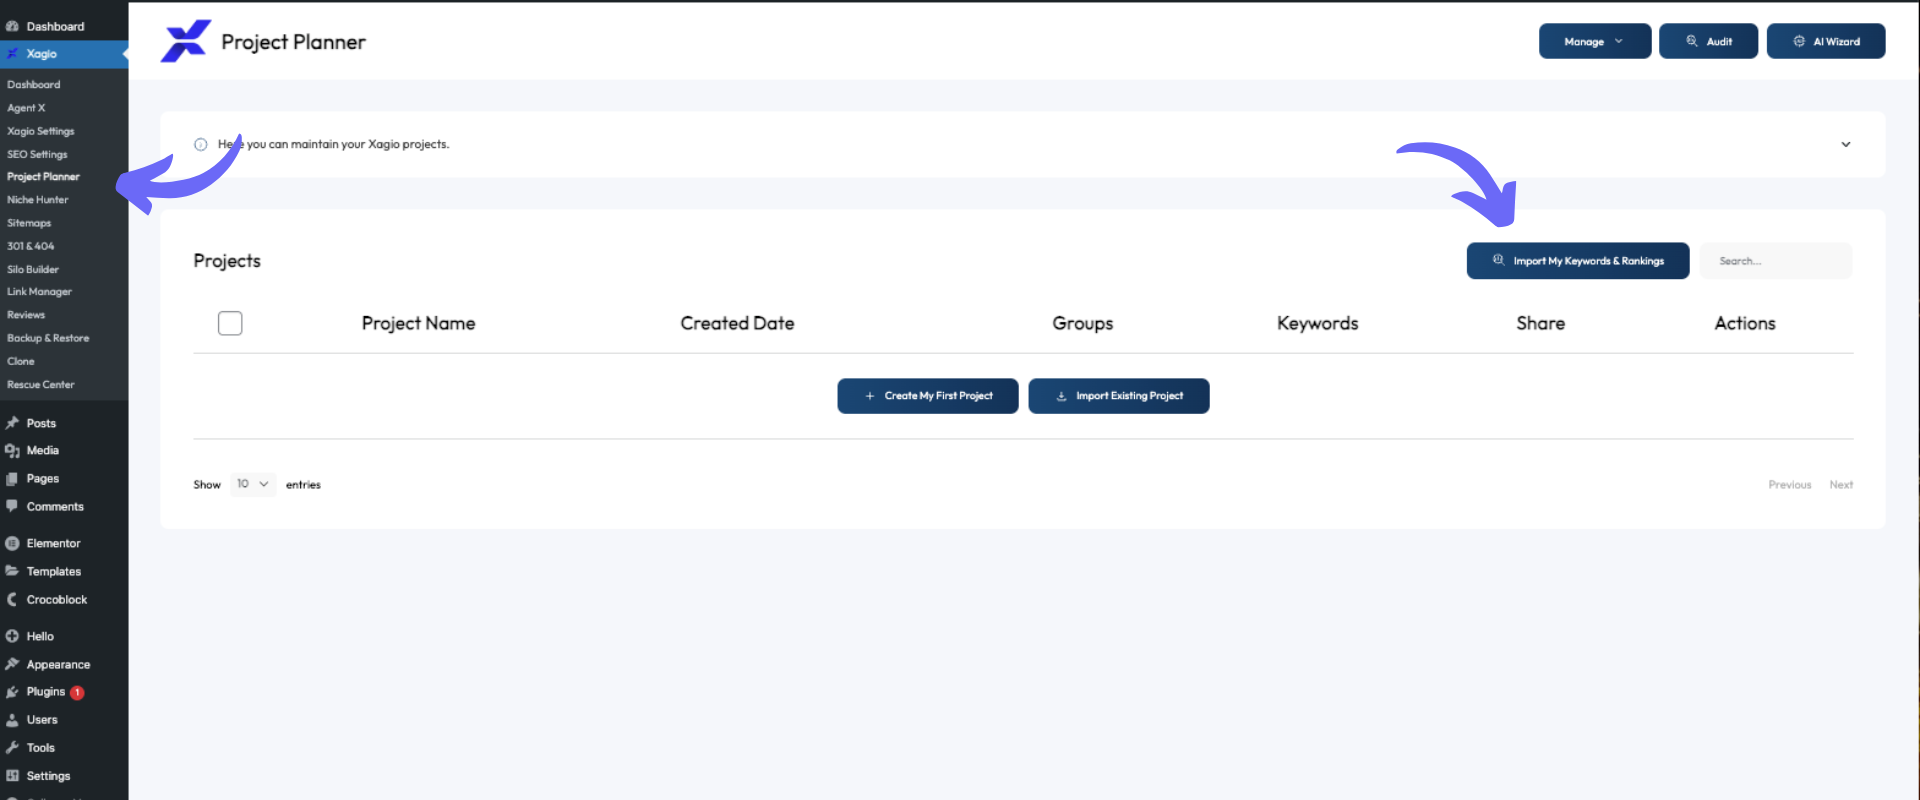
On an established site, I recommend that you start with an audit of your own site to give you all the existing pages and ranking keywords. The good news is that this audit will take less than 10 seconds to give you a full visual picture.
Head to the Project Planner tab in the Xagio plugin and then click on the “Import My Keywords & Rankings” button.
Once your audit is ready, you should then start researching the top 3–5 competitor pages. This process is also how you would proceed if you’re starting a brand new site.
The way you do this is by identifying your top competitors and then running an audit for each one of them. This gives you a comprehensive list of all the different topics related to your niche.
I recommend checking out our blog post here for more detailed instructions on doing recursive keyword research.
Note that you’ll need XAGS in your Xagio account to use premium features like Audits. You can learn more about XAGS, how to use them, and where to get more on our introduction page.
2 - Set Up Pages For All Keyword Groups
Based on the above audits, you want to ensure that you have pages set up for each keyword group before you start using the Silo Builder. The reason for this is that Xagio’s Silo Builder will only load those pages already created.
While you can add pages from within Silo Builder, it’s a lot easier to start creating visual connections for pages already created.
So, whether it’s a landing page, blog post, or anything else that’s on your content list, try to get those pages configured with on-page optimizations and content first.
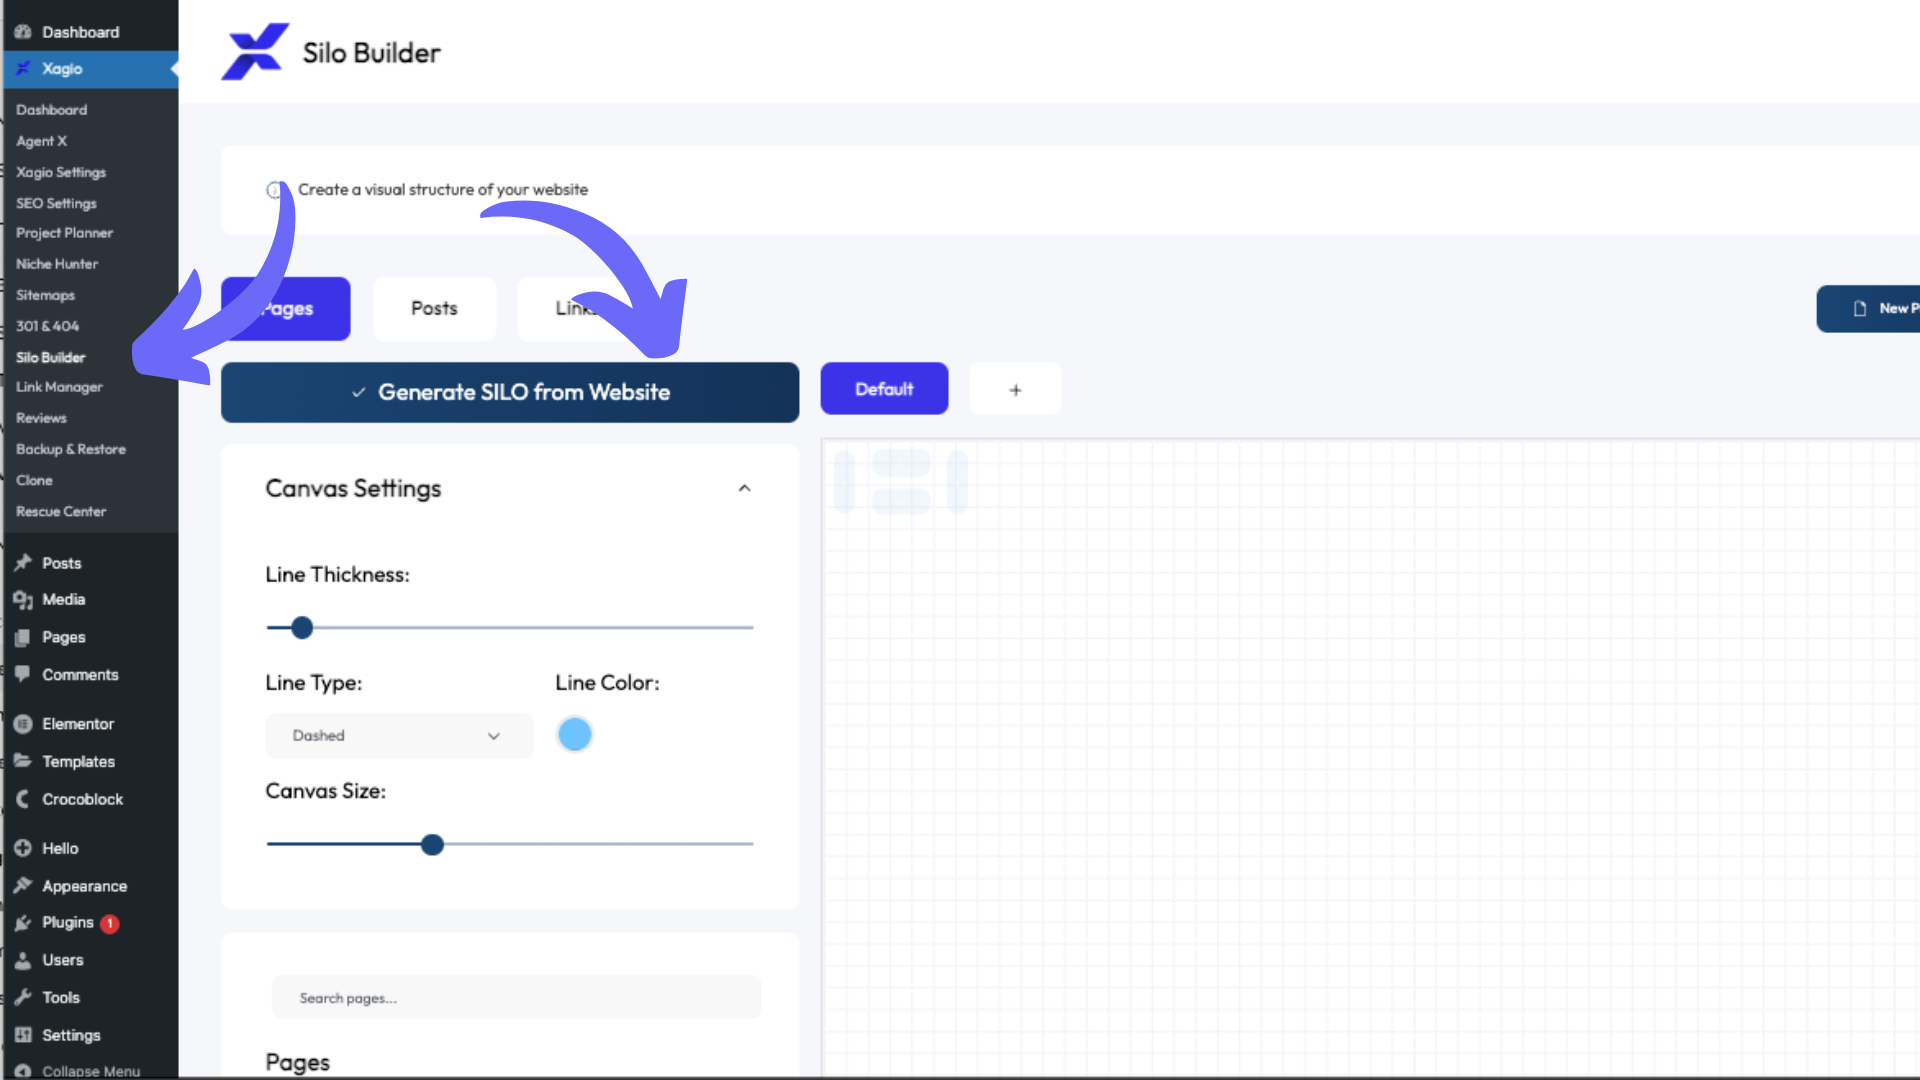
3 - Use Xagio’s Visual Silo Builder
The next thing you need to do is go to the Silo Builder in your Xagio WordPress plugin and decide whether you’re going to build a physical or virtual silo (see above for details).
The first thing you’ll see in Silo Builder is that this section is broken down into Pages, Posts, and Links. Pages is where you’ll be creating physical silos, Posts is where you can silo your blog posts, and Links is where you can create virtual silos.
Here are step-by-step instructions I use on my websites.
Create Physical Silos
The first step to do on the Pages section is to click on the “Generate SILO from Website” button.
On the next pop-up screen, I suggest that you select “Import all Pages” as you’ll be able to rearrange and remove pages in the visual builder later.
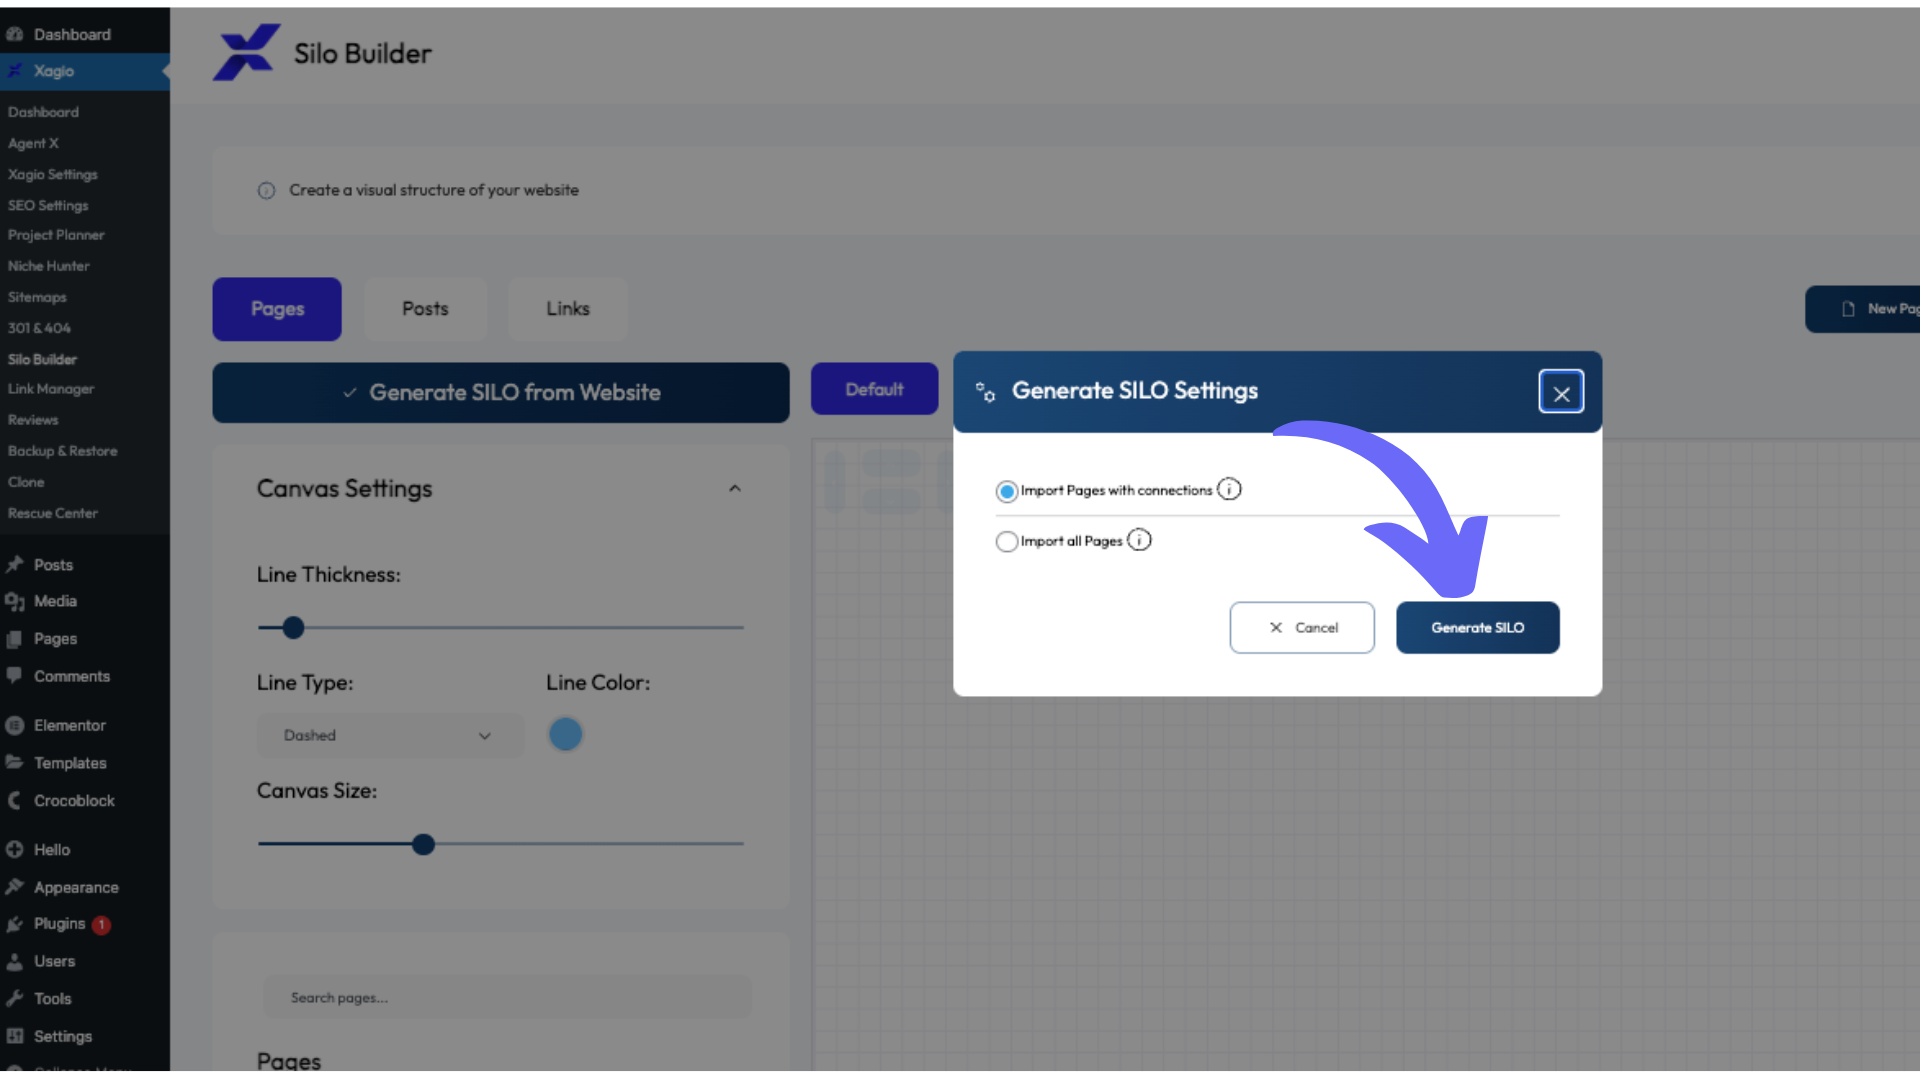
Once you click on “Generate SILO”, Xagio will load all your pages; and if there are already parent/child relationships configured in WordPress, then those connections will also display.
This is where you’ll now get to experience the full power of Xagio’s Silo Builder.
In the visual pane, you’ll see all the current pages on your site, and you can easily rearrange them into groups. What I do is arrange the top silo pages in a row with a bit of space between them.
You can then easily place all the relevant pages under each top silo page. Once you have done this for all the pages, you should start seeing how your silos are currently filled with content pages.
The next thing you need to do is click on the small arrow in the bottom corner of the top silo page and then move your mouse to the top left corner of one of the pages in the silo. You’ll notice this will create a visible line between the two pages.
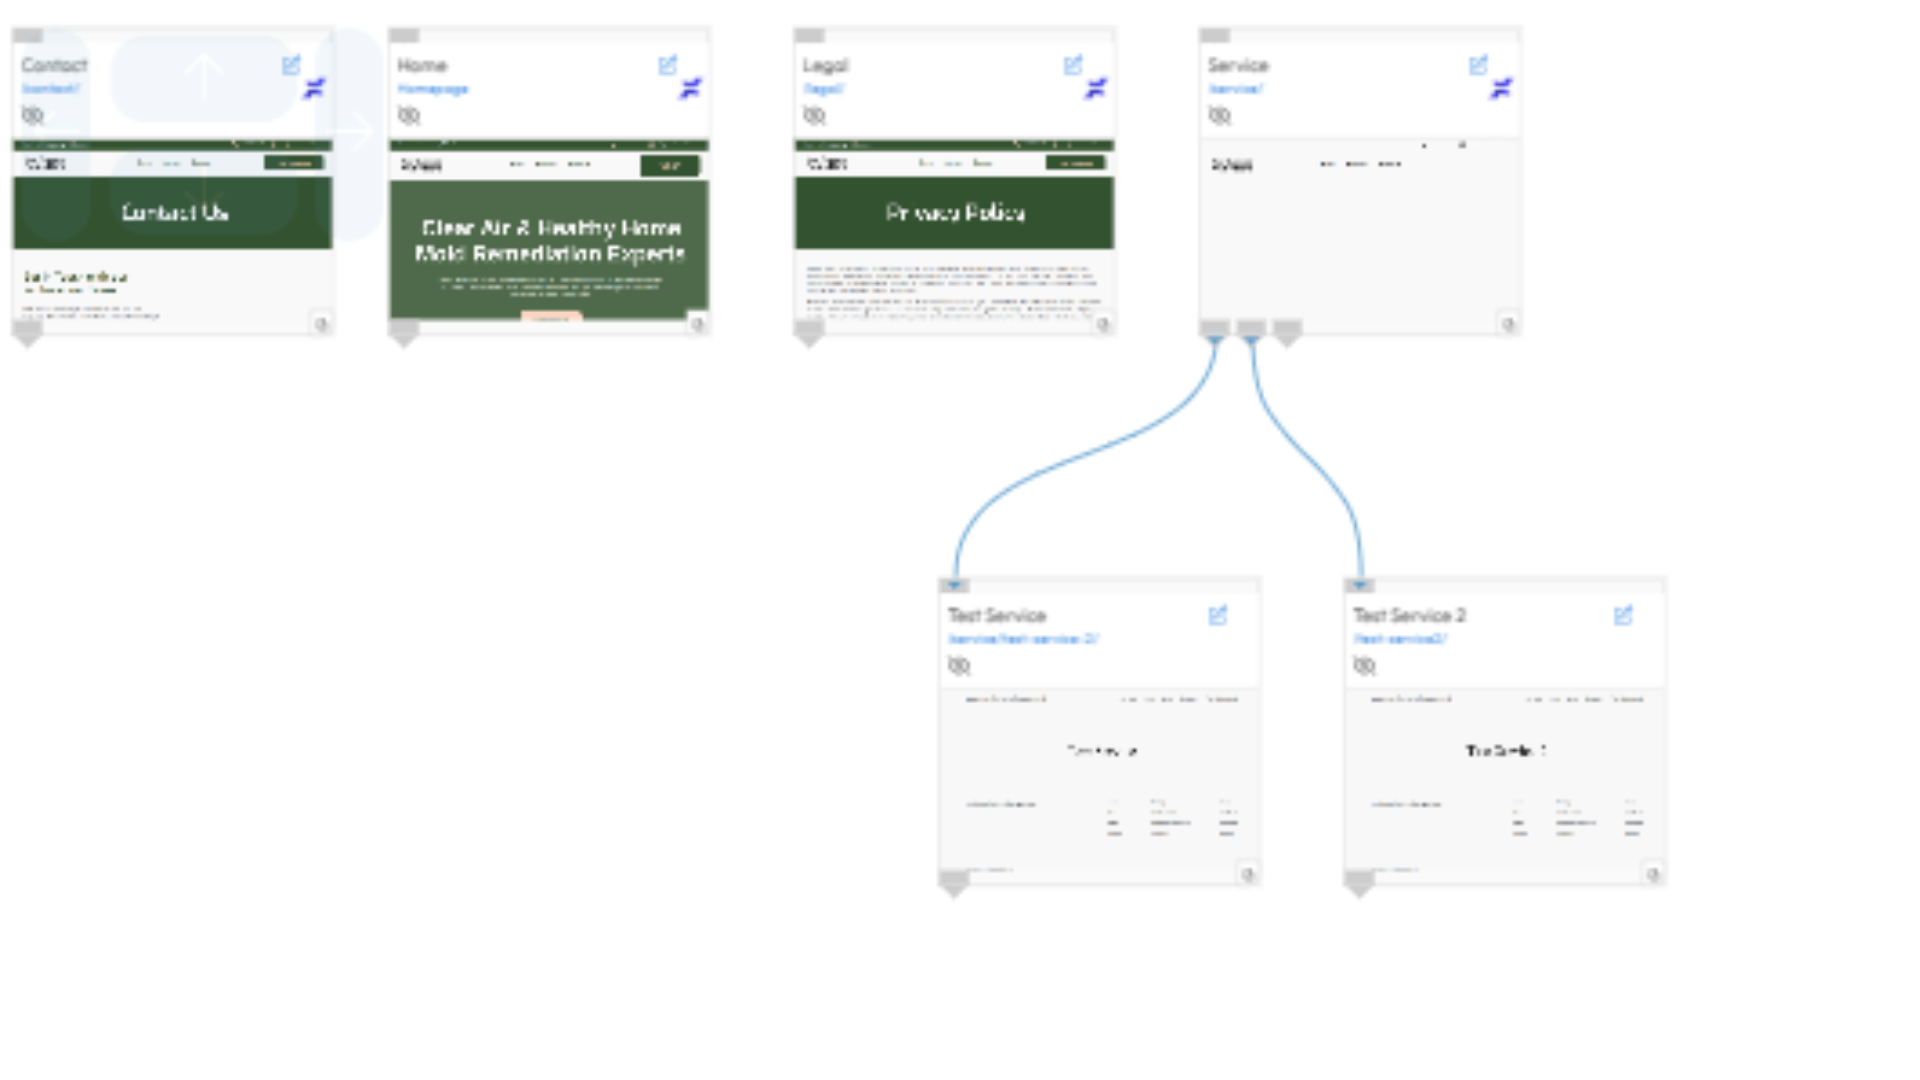
Keep repeating this for all silos and pages, until you have completed the full configuration.
Advanced Tip: If you realize that you’re missing a page, then you can easily create a new blank page from within Silo Builder.
Simply click on the “New Page/Post” button, enter a Title and slug, and choose whether it’s published or draft. Once you create the page, it will appear in the list of pages on the left-hand side, and you’ll be able to drag it into the visual builder.
Once you’re happy with the setup, it’s time to hit the “Save Pages” button at the top of the screen.
Here’s what happens when you hit the save button.
All those parent/child connections you have made in the visual Silo Builder will not be configured in your WordPress settings. That means you won’t have to go into all the individual pages and set up those relationships.
It can literally save you endless hours of manual and mind-numbing work.
Create Virtual Silos
As mentioned above, virtual silos don’t create a parent/child relationship that is reflected in the URL structure; instead, this approach uses internal links to identify the relationship between posts in a silo.
To do this in Xagio, you’ll head to the Silo Builder tab in the WordPress plugin and then click on the Links section. When you first do this, you’ll have to click on “Generate SILO from Website” to load all the pages and the respective links between them.
If there’s an internal link between pages, then it will visually show with a line. This is extremely helpful to get a full picture of how your silo is currently interlinked.
What I recommend you do then is to arrange the pages by topical silo so that it’s easier to see which ones belong together.
Then, simply create new links between a top-of-the-silo landing page and related pages by connecting a line from the top page to each individual page.
Once you’re happy with the connections, hit the “Save Links” button. You’ll still have to manually create the internal contextual links, but this tool helps you to visualize what you need to do.
Create Blog Silos
The final part of Silo Builder that you definitely want to visit if you have a blog with lots of content is the Posts section.
When you hit that “Generate SILO from Website” button, it will load all your blog posts along with relationships to categories and tags.
If you’ve ever tried to clean up categories and tags for a large blog, you know how frustrating it can be when you have to manually do it for each individual post.
The faster way to do this is to go to the Silo Builder tab on your Xagio WordPress plugin and then go to the Posts section. Here you’ll click on the “Generate SILO from Website” button, and Xagio will load all the blog posts and show you the relationships to categories and tags.
The visual tool allows you to add and remove connections between posts and categories/tags, and once you hit the “Save Posts” button, Xagio will update all the posts with your changes.
Another great benefit of using the Posts section is that you can also find orphan tags and categories.
You can then decide whether they are needed at all or identify issues with missing category and tag links on certain blog posts.
I guarantee you that this will save you a ton of time and frustration compared to the manual process.
Start Mapping Your Silo Structure With Xagio
If you’ve been struggling to hit the top results in search engines and haven’t implemented a proper silo structure, then using Xagio to do this in a matter of minutes could have a big impact on your rankings.
With the visual editing tool and the ability to pre-load your existing silo structure, it simply couldn’t be any more efficient to implement this critical optimization.
Install the Xagio plugin on your site today and link it to your email address to start experiencing this feature. You’ll be amazed at how easy and fast it will be to get your silo structure planned and implemented.