Schema markup is one of those SEO topics that is often misunderstood and regularly scares people enough because it’s such technical data.
From figuring out what the syntax has to be to be compliant to completely different schema markup code designs, it can be a bit of a challenge to get right.
Especially when you consider that most tools don’t make it particularly easy.
However, implementing schema markup doesn’t have to be a difficult or time-consuming task.
In this blog post, I’ll tell you exactly what you need to know about the benefits and the types of schema markup. We’ll also look at how to implement structured data without programming skills using Xagio’s built-in features.
It’s the perfect solution for experienced and novice SEOs.
Why Is Schema Markup Important?
There are three main reasons why it’s so important to add structured data to all of your pages. Ultimately, they all directly and indirectly influence how favorable search engines view your site.
1. Provide Context For Search Engines
One of the main things search bots do is analyze the content on pages, including all the HTML tags for visible content.
But that only provides part of the picture.
With the right schema markup code, you can provide every search engine with additional data about your content so that it can intelligently display relevant content.
For example, you can ensure that search engines understand that you’re publishing a product review that compares a few different brands.
Or, for a local business, you can include information about the type of business, locations, and customer review rating.
Well-designed schema markup plays a critical role in getting rich snippets in all major search engines, and that can make your site attract a lot more clicks, even if it’s not in the top spot of the SERPs yet.
2. Gain A Competitive Edge
Here are two interesting things to keep in mind.
According to research from SchemaApp, only 40% of small business owners confirmed that they are using schema markup to provide structure data for their content. That number goes drastically down the larger an organization becomes.
My guess would also be that a detailed analysis of websites would reveal that schema markup isn’t consistently set up across all pages.
And that gives you a huge opportunity to gain a competitive edge in the search engines.
The second competitive advantage has been confirmed by research published in Website Magazine: adding schema markup can help your site gain an average of four positions in the SERPs.
That’s quite an ROI for something that is easier than you might expect to implement.
More on that shortly.
3. Enhanced Appearance In Search Engines
Just looking at structured data in schema markup might lead you to believe that it’s simply code that provides guidance to search engines.
But there’s more to it.
What schema markup ultimately allows you to do is gain more control over how search engines display your website in the SERPs.
Have you ever seen a website listed with a breakdown of content topics? Or how about those review ratings with stars that make your site pop and stand out from competitors in the search results?
All of that is possible when you take the right approach to using schema markup and targeting rich snippets.
And it all starts with schema types.
What Does Schema Markup Include?
I won’t go into a programming-level description of the structure of schema markup, but it’s important to understand a few technical things.
Types Of Schema Data
One of the most common questions I get asked is: “What schema type should I use on my pages?”
And the simple answer is: pick the type that best suits your niche and topic.
Here’s what I mean.
There are literally hundreds of schema markup types, meaning that you’ll easily find one that suits your pages. You can and should choose a type that best suits each type of page.
If you have an affiliate site with a mix of review and informational pages, then mainly focus on the review and article markup.
If you’re doing local SEO, you’ll probably use the local business markup, but the organization markup could also be helpful.
Here is just a short list of commonly used schema markup types:
- Product Markup
- Review Markup
- Course Markup
- Organization Markup
- Article Markup
- Events Markup
- Local Business Markup
- TV Shows and Rating Markup
- TV Shows and Rating Markup
- Software Markup
As you can see, you can get extremely precise with your schema markup types, and that’s why choosing the best-suited one can pay such great dividends in your SEO efforts.
Schema Markup Tagging
The next thing you have to consider in structured schema markup is the countless different tagging options.
Schema tags are individual data points where you can define anything from the name of an article to its author and even a product or article rating.
It doesn’t make sense to use all the available tags, and you simply need to use your own judgment about which ones you’ll populate.
When it comes to these tags, JSON LD schema markup rules don’t dictate that they all have to be populated. My general advice is to add as many as you can quickly identify.
And doing that is a lot easier with Xagio.
The Xagio AI Approach To Structured Data
Most people I talk to fall into two categories when it comes to structured data markup.
There are inexperienced SEOs who struggle with the technical side of understanding and configuring HTML code; and then there are experienced SEOs who find the process fragmented, repetitive, and highly inefficient.
While WordPress is a great content management system, it doesn’t have a built-in schema tool, and that means SEOs of all experience levels end up struggling with this one task.
Here’s how you can handle it with Xagio in record time.
1. Review The Type Of Content You Have
The first thing you need to work out is what type of schema best suits all the individual pages on your site. You might have a local business with multiple location and service pages, as well as an active blog with general information.
Or maybe you have an affiliate site with product reviews and informational content about different topics in your niche.
Figure out what kind of pages you have first, and write down what you think the right schema type might be. At this stage, it’s good enough to just take a guess if you haven’t done this before.
2. Check What Your Competitors Are Doing
The next thing you should do is check the search results for the main keyword you’re targeting on a page. You’ll want to check the top 3 positions, especially those pages with rich snippets like star ratings and additional page content breakdown.
The easiest way to do this is by using the Meta Explorer Chrome extension to view the schema of any page along with other hidden page elements like meta description.
One thing you’ll notice is that the top results typically have schema set up, and they will more than likely have the same type.
Also, take note of all the tags used in all the top three results and use those as a baseline for your schema.
Ideally, include all the tags that your top three competitors are using.
3. Create Your Schema Markup
This is where things get interesting and insanely easy for all types of users. Xagio offers you four different options to create and implement schema.
Option 1: Create Your Schema In Xagio’s Cloud App
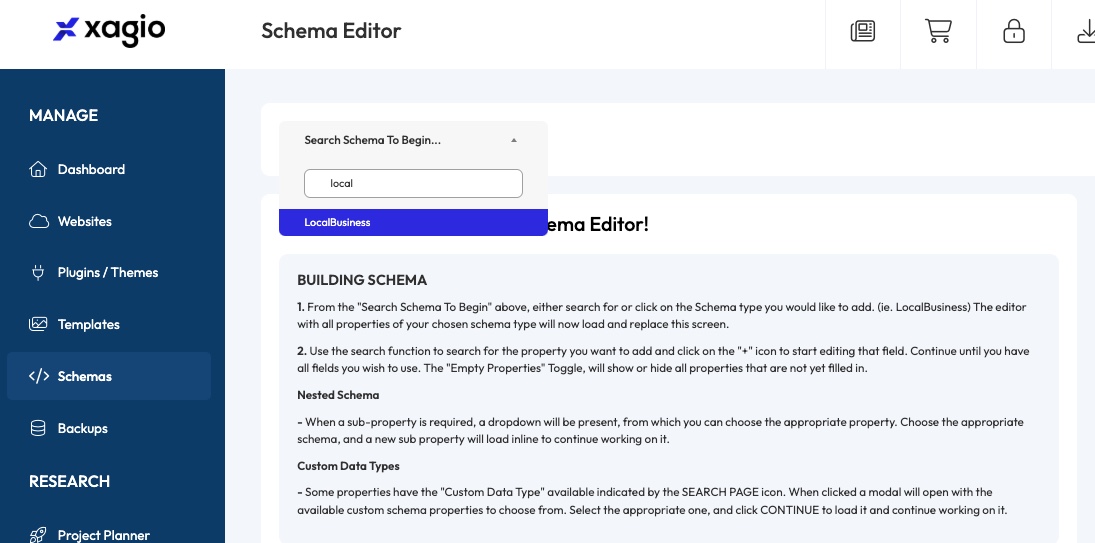
If you have a good understanding of schema code and know what types you need to set up, then head to the Schema tab in the Xagio cloud app.
To add a new schema, simply use the search field, e.g., enter local to find the LocalBusiness schema type.
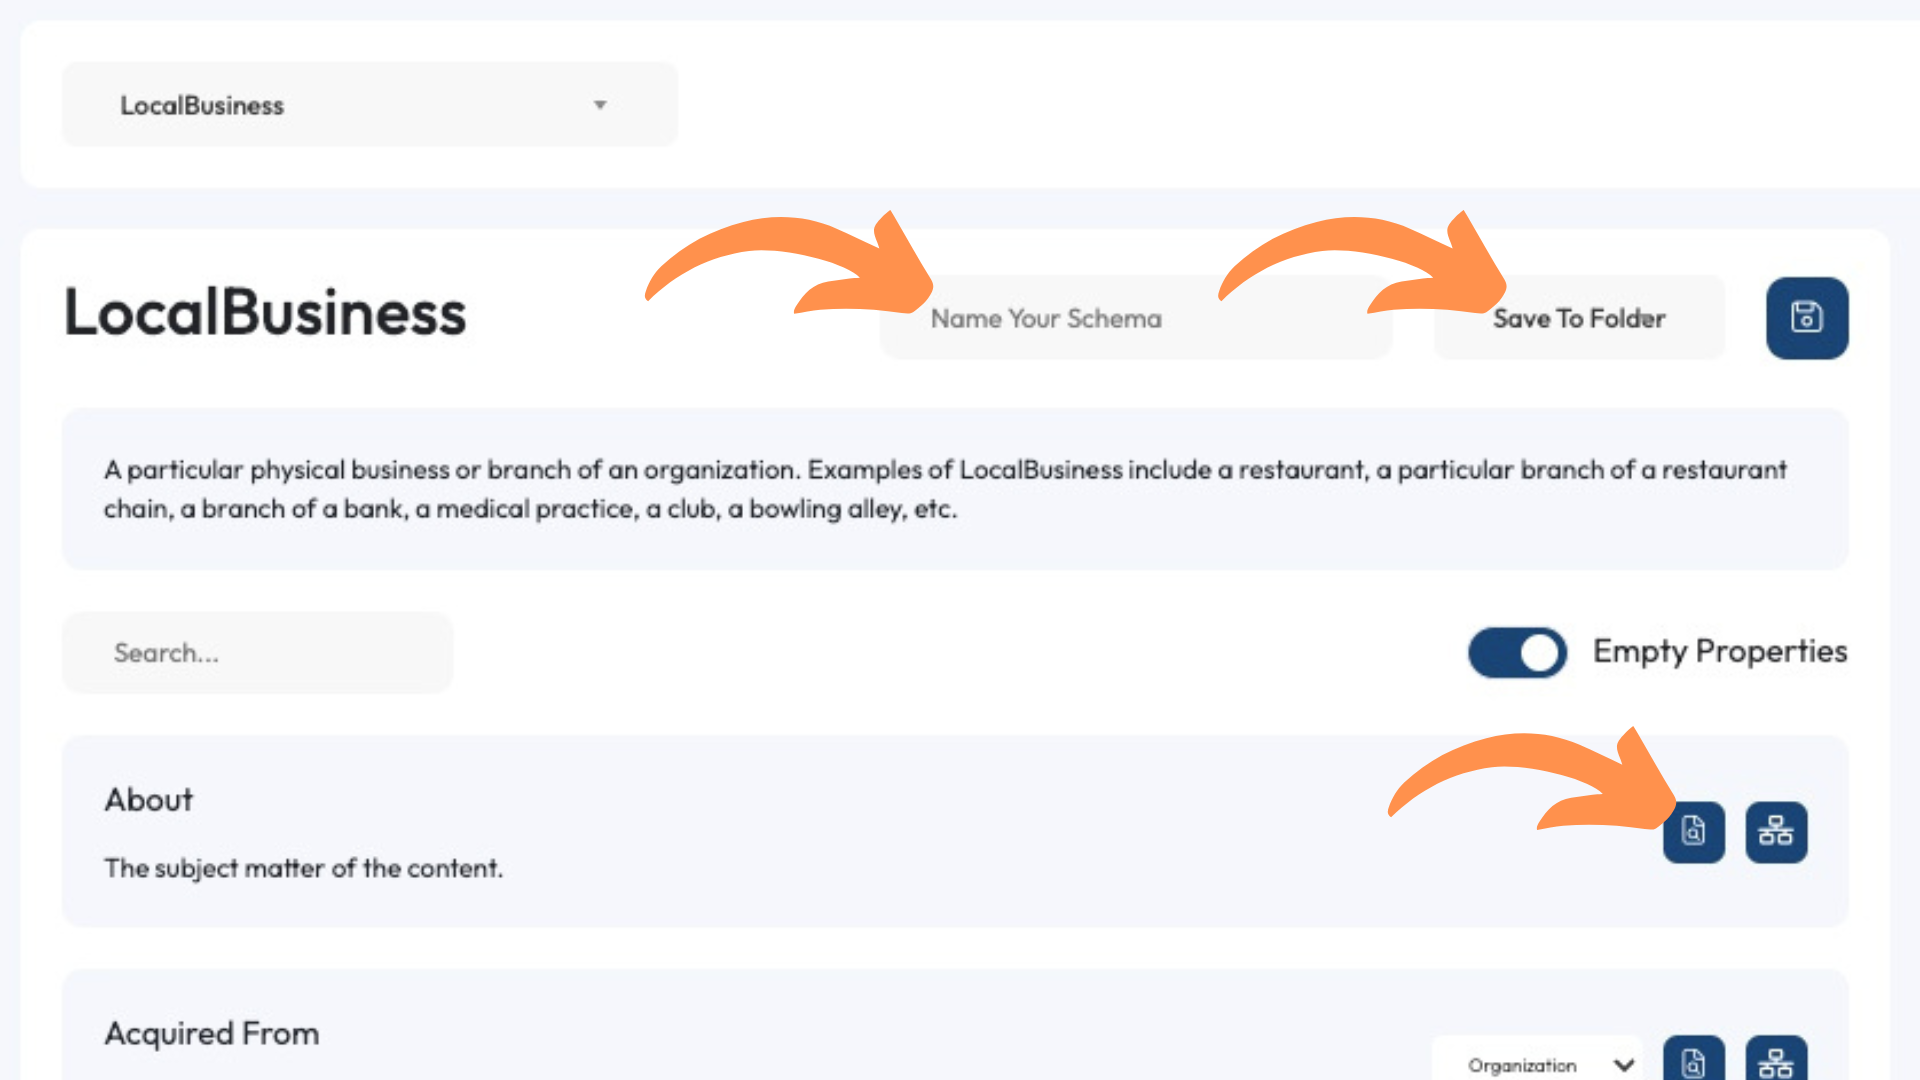
Once you select LocalBusiness, the right-hand section will populate with the Schema Editor.
I recommend that you give your schema a name and save it to a project specific folder so that you can easily pick it up in later steps to add to a page.
The next thing you want to do is search for the tags you identified in step 2 above and click the “+” button to add those tags. This will enable a text field where you can add the relevant data, which could be a link or text to describe the tag.
When you’re done adding all the relevant tags, hit the save button, and the schema will be available to add to a web page.
To add the schema to a page, go to WordPress and launch the editor for the page that you want to update. Under the text editing section, you’ll see the Xagio options and simply click on the Schema tab.
Click on the “Assign Schema” button and choose the one that you just set up in the cloud app.
Xagio will then automatically add the schema to the right place in the HTML code for the page, meaning you avoid copying and pasting it between different tools.
Even for a beginner SEO, this process doesn’t take long to get used to. But there are faster options.
-
Pro Tip: If you can’t find an exact schema type to match a page, then gradually work away from highly specific search terms.
Example: If a page is about “eyebrow tinting” there’s not going to be a schema for that. But you can take a more general view and enter “beauty” as the search term. That way, you’ll get the most relevant option.
Option 2: Duplicate Competitor Schema In Xagio Cloud
Unless you have extremely specific needs for targeting rich snippets in a unique way, one of the fastest options you have to add structured data is to duplicate what your competitors are doing.
I already outlined in step 2 above that you should look at the top search results to see what they are doing for schemas.
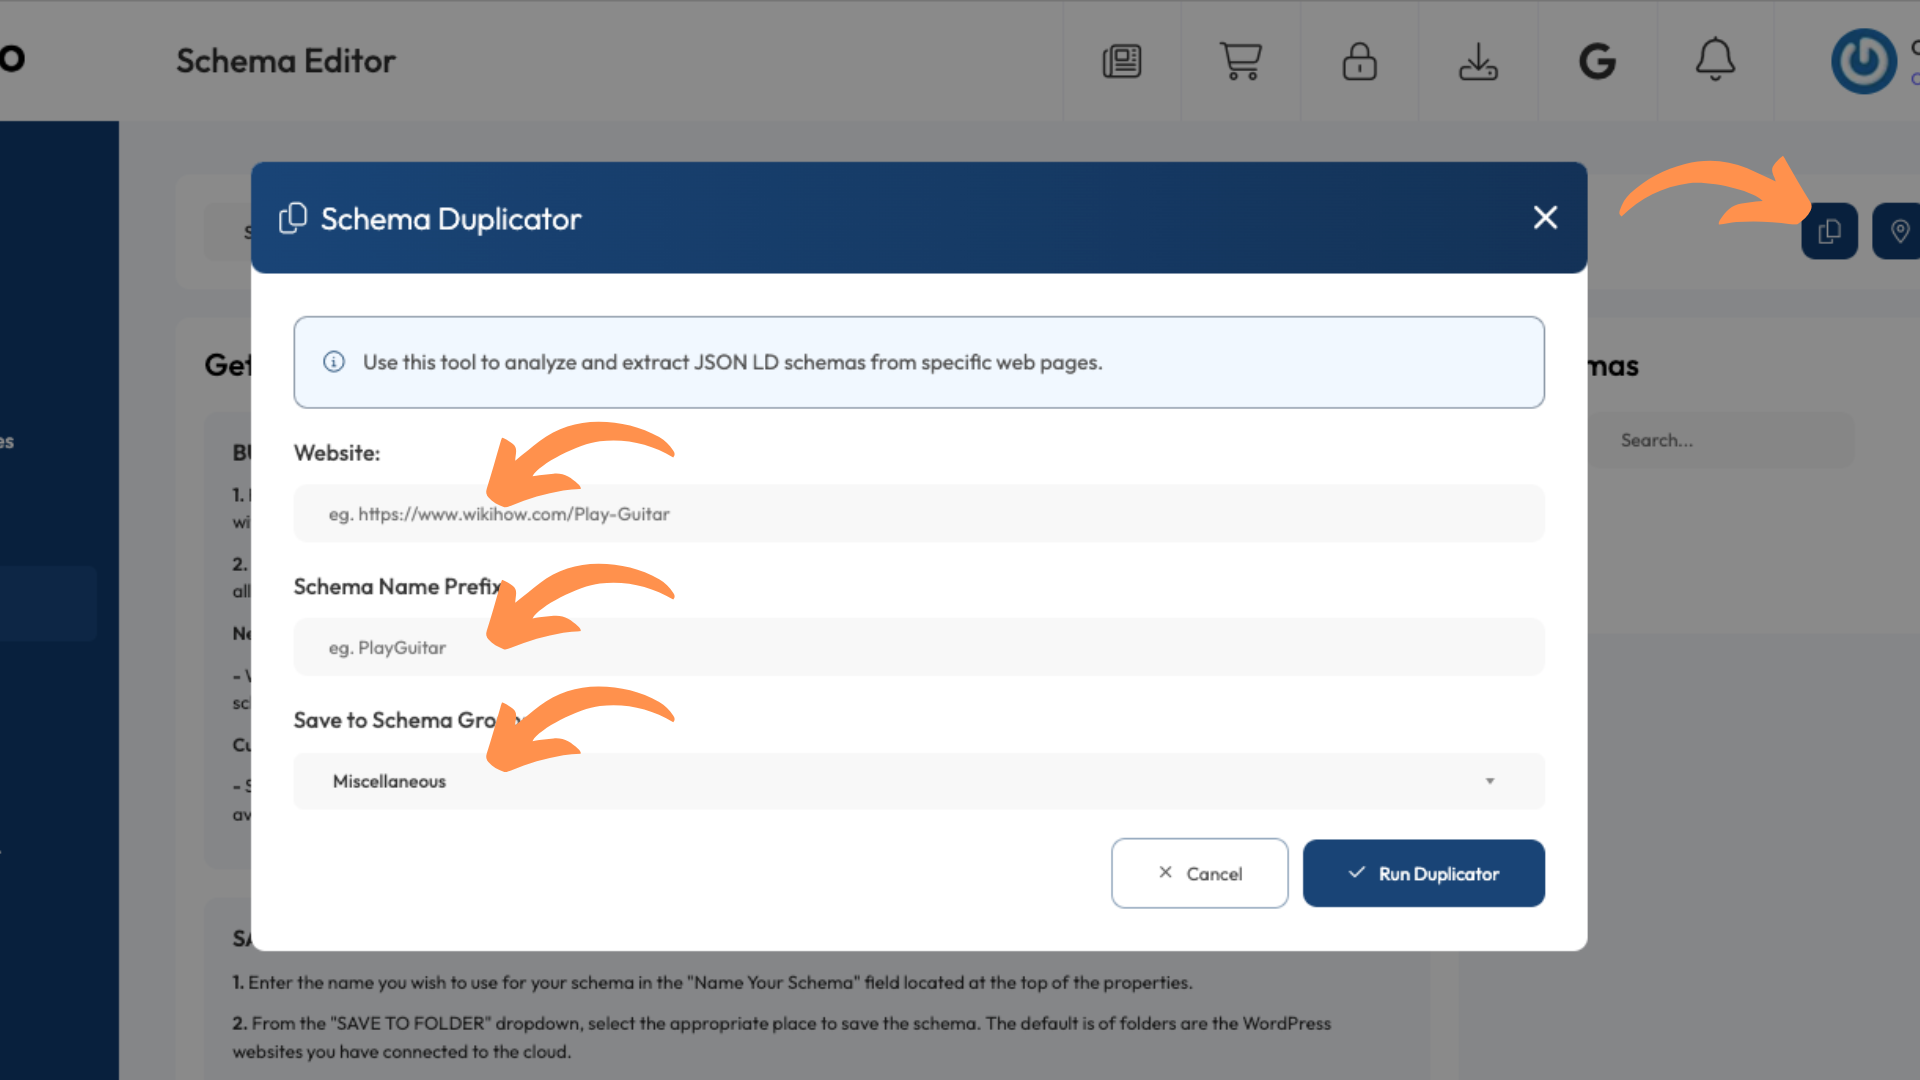
With Xagio’s cloud app, you can then head to the Schema tab and click on the “Duplicator” button.
Simply add the competitor’s URL, schema name, and folder location, and Xagio will duplicate it for you.
It populates with the details from the competitor’s page, and you can then simply update the tags with your relevant data.
I personally use this tool a lot, and even experienced SEOs will love the simplicity and speed it adds to their schema markup process.
Option 3: Generate Schema Using AI
Another option for a novice SEO is to use Xagio’s AI-powered schema builder.
In the Xagio plugin section at the bottom of the WordPress editor, you can click on the Schema tab and then hit the “Generate AI Schema” button (check out the AI Schema Generator help doc).
A message will pop up telling you how many of your AI credits it will require, and you simply click continue.
Within a few seconds, you’ll have an AI-generated schema and you can click on it to view and make edits.
Clicking on the schema in the “Assigned Schema” section will automatically bring you to the Xagio Cloud App. This is where you can then add more tags or make adjustments to the AI-generated ones.
It’s a powerful tool that relies on analyzing your existing page content, Title tag, H1 tag, and meta description.
The better you have those optimized, the more reliable the AI schema results will be.
The AI Schema Generator is a premium feature and will require XAGS to use. You can learn more about XAGS in our blog, where we show you exactly how they work and how to top up your account.
Option 4: Generate Schema Using Xagio Wizard
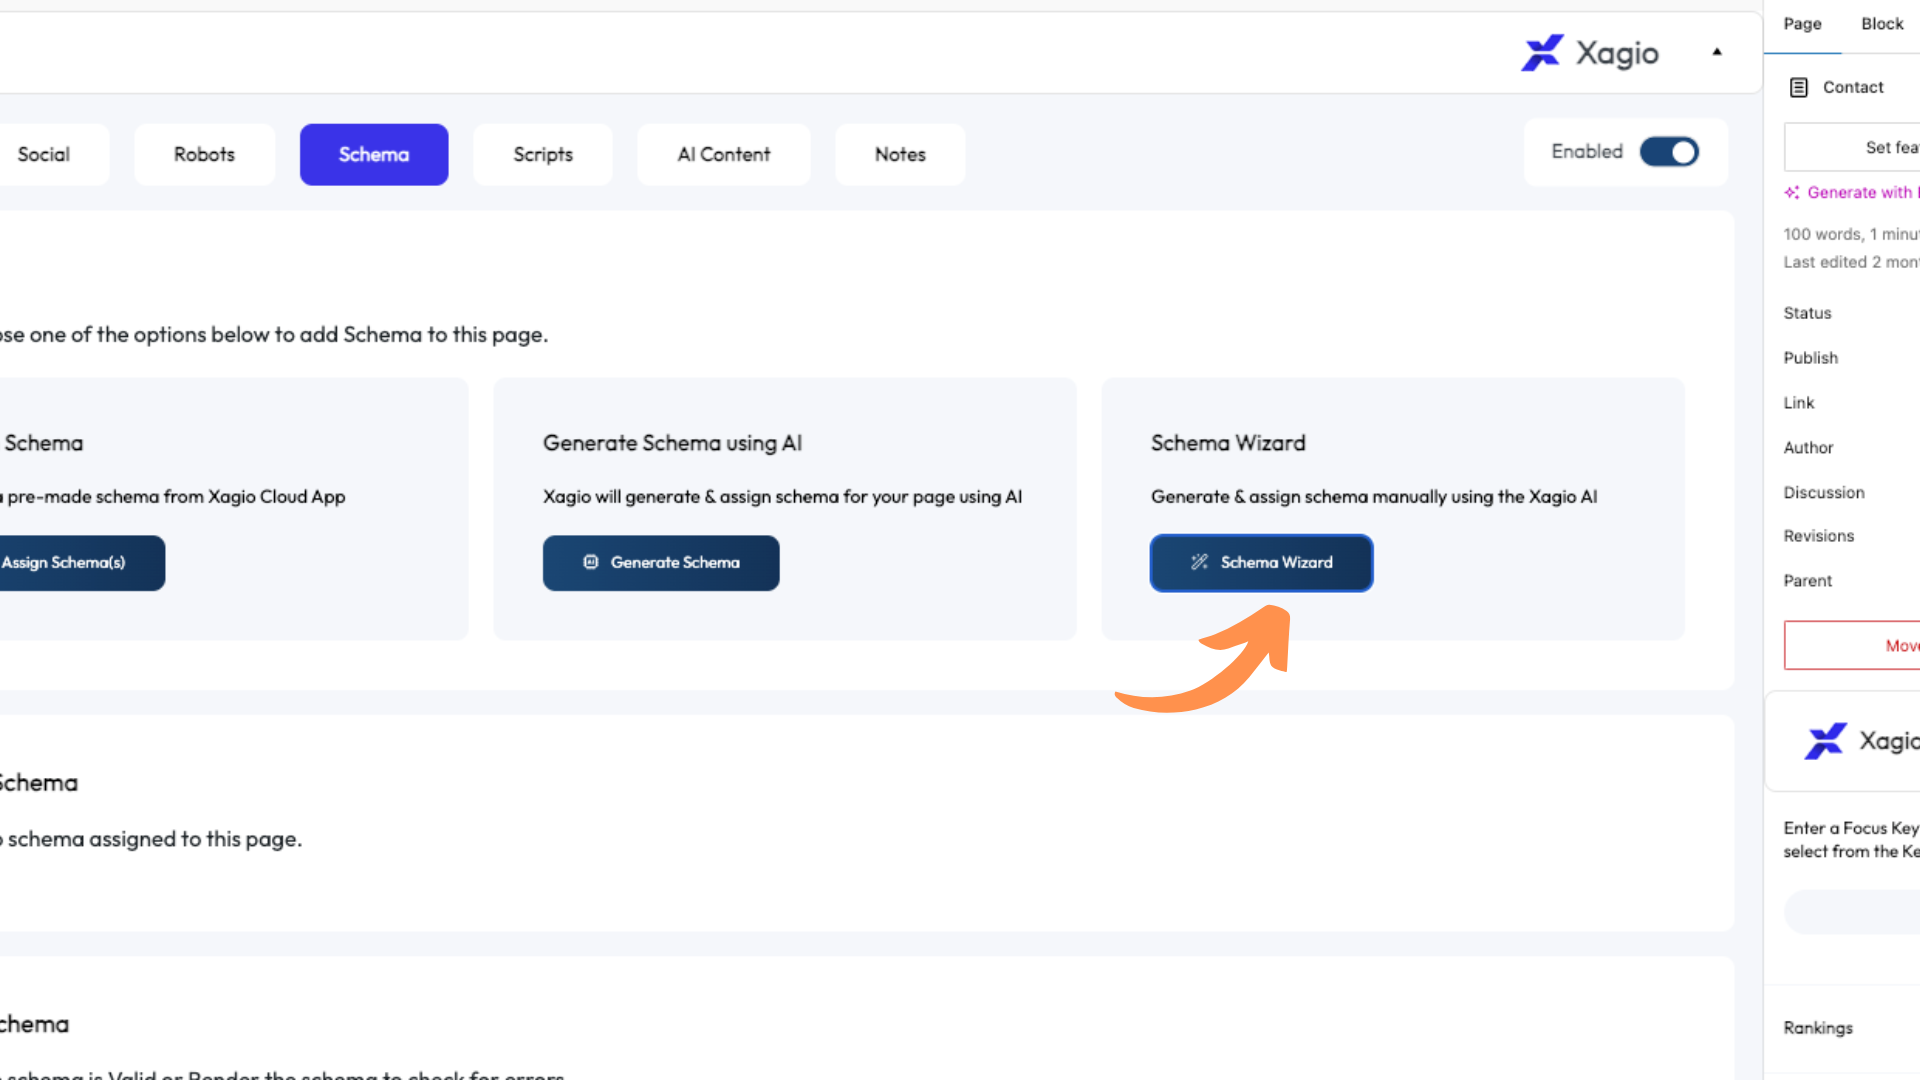
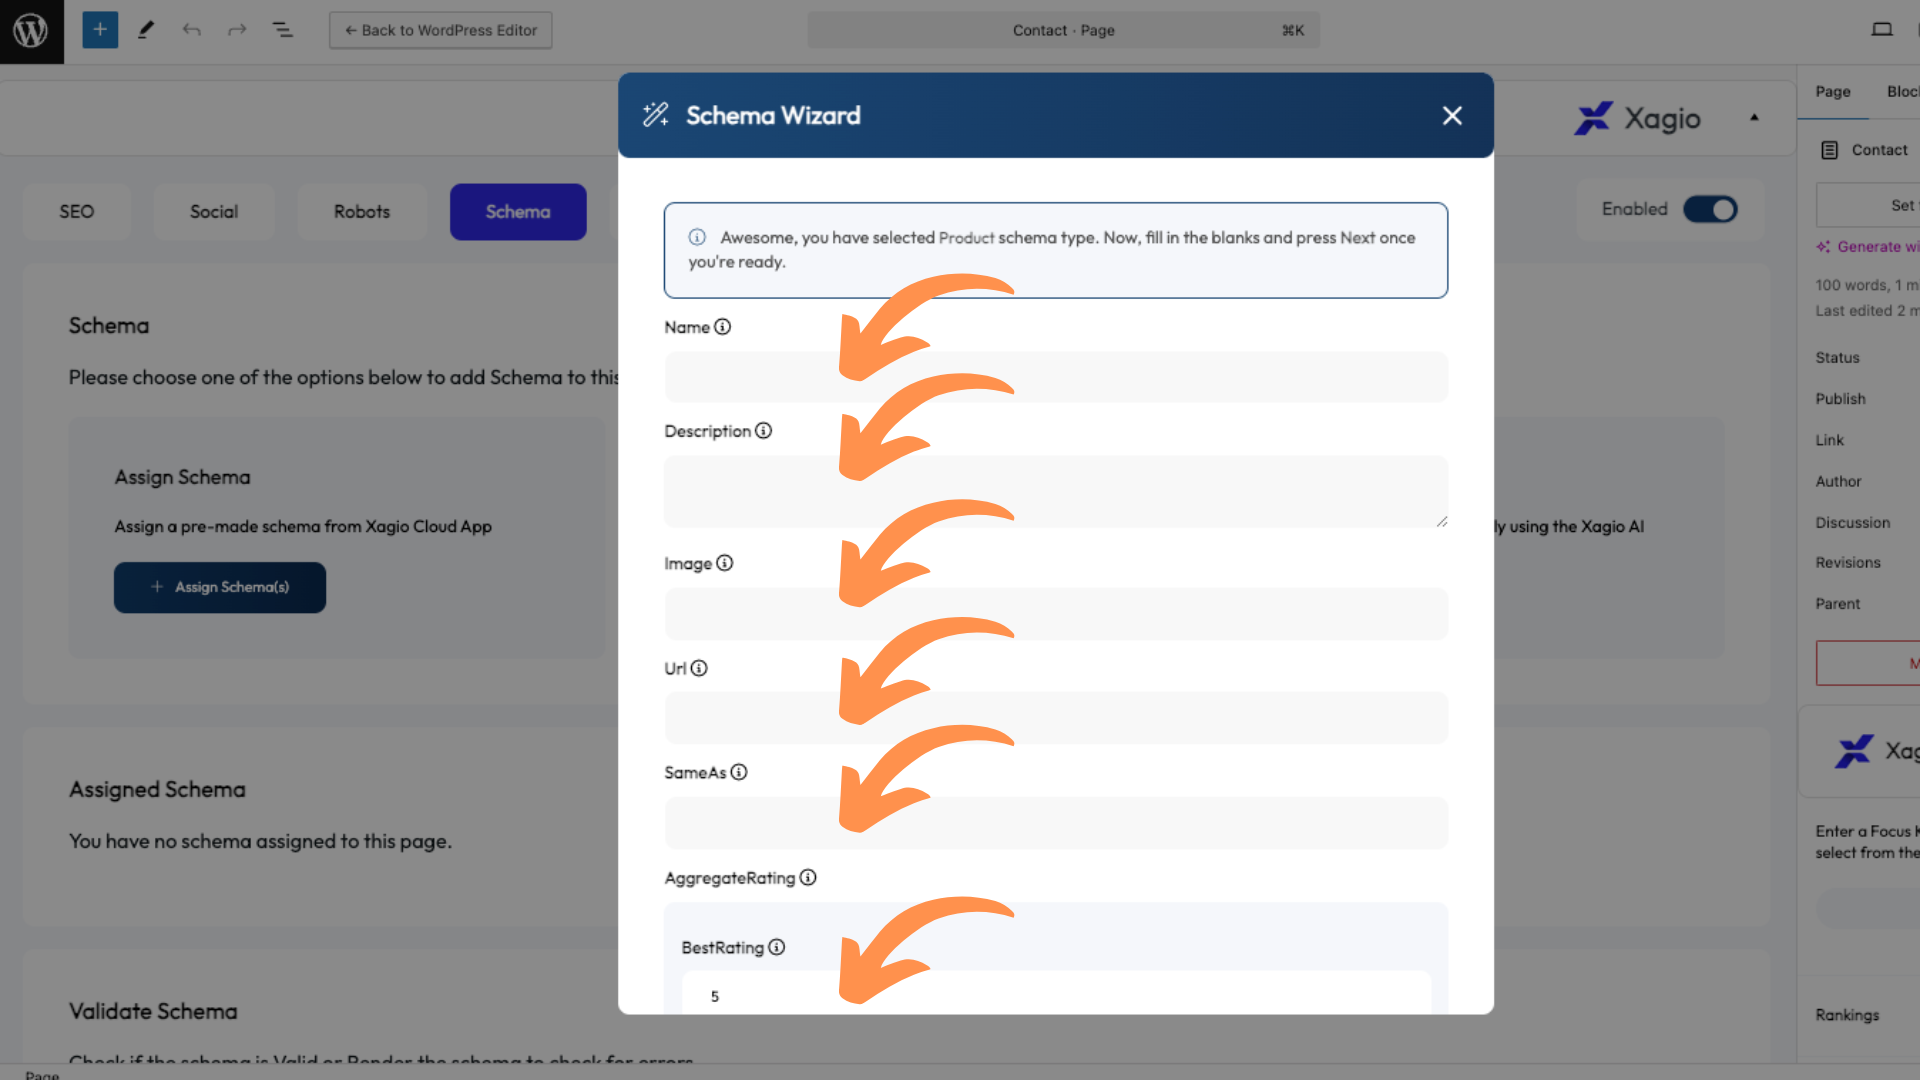
And finally, another great tool we created for beginner and advanced SEOs is the Schema Wizard.
When you’re in the WordPress page editor, you go to the Schema section of the Xagio plugin under the editor and click on the “Schema Wizard” button.
At the moment, the Wizard will guide you through setting up five types of schema, and we chose these because they are the most common ones:
- Article
- Product
- Service
- LocalBusiness
- Organization
Once you select the type that’s most suitable, you’ll get a list of tags that you need to consider. This list will change for different types of schema, and I recommend populating as many as it makes sense.
When you’ve populated the tags with data, click the Next button and then “Generate Schema” for Xagio to take care of the rest.
If you need to make further changes, you can simply go to the Schema section in the Xagio Cloud App, where you can access the data.
4. Validate Your Schema
At this stage, you should have reached that “OMG-I-wish-I-had-this-tool-years-ago” moment. Your schema process will be a lot more effective and efficient; the only thing left to do is validate the schema.
Now, with experience, it won’t be necessary to do this for simple schemas like Article types.
But if you’re setting up structured schema data to catch some rich snippets in Google search results, then I suggest running the schema code through Google’s validation tool.
To do this, open the schema in Xagio’s Cloud App and then click on the “</>” button. This will open the rendered HTML, and you can simply copy and paste it into Google’s validation tool.
This tool will display warnings and errors, and the main focus should be on any errors. But getting rid of warnings is a good best practice, too.
Xagio’s Schema Editor also validates the content directly. There is a validation button that will check for errors only.
If you’re not concerned about warnings, then the built-in validation will work just fine
Benefits Compared To The Manual Process
Even though Google provides a tool for creating a compliant schema for your web pages, you need to switch between tools and copy/paste the results; it’s a completely fragmented process.
Here’s why I hated the process and had my developers create a tool for it.
1. Time Savings
The generally recommended approach to creating schema markup is to use Google’s Structured Data Markup Helper. While it will produce the HTML tags for the schema markup on individual pages, it’s a very manual process.
You start by entering the web page you want to target. Then, you manually select the different HTML tags and associate them with your content or manually enter text.
There’s no automation, and you’ll have to manually copy and paste the HTML code to your website.
That involves using the HTML editor for your page or adding yet another plugin to make it easier to get the schema code in the right place.
With Xagio, you can do everything from within the plugin and the web page editor. And you can set certain variables to automatically populate, saving you a ton of time.
2. Reduced Human Error
Google and other search engines will analyze your schema and if there are syntax or content errors, then it will likely impact the search results of web pages.
Having manually added structured data to my sites for years, I can tell you that, even with experience, human error and a simple copy/paste error will cause issues.
If you’ve seen those cryptic schema errors in Google Search Console, you’ll know how frustrating it is to troubleshoot such errors.
With Xagio, you practically eliminate human errors, as your main input is to provide the data elements. There’s no risk of missing a character in the code, and the plugin places the schema right where it should be.
3. No Need For Extra Tools
If you’ve been one of the diligent SEOs who always add schema to pages, then you’ll probably agree with me that using multiple tools and constantly copying and pasting is painful and frustrating.
Not to mention that it leaves you open to simple mistakes.
With Xagio, you can handle the schema markup process from start to finish using one plugin. No more managing multiple plugins or switching between websites to get all the details you need.
Start Using Xagio AI To Automate Schema Implementation
If you’ve got pages and keywords not ranking as well as you expect them to do in the search results, then check your schema markups for potential issues.
Whether you’re an advanced SEO looking for a faster and more effective way to implement schema markup or you’re inexperienced and afraid of making mistakes, Xagio is the one tool that will deliver consistent results with an insanely simple process.
Sign up for a free account and start using the Schema section in your WordPress page editor. You’ll be surprised how easy it is to set up and test your schema data with just a few clicks.
If you need more XAGS to update multiple pages with the AI Schema Generator, then check out our guide on how to top up your account.


